Multi Radio Last updated: 20 Aug 2023

Thank you for purchasing our app. If you have any questions that are beyond the scope of this help file, please feel free to email via my user page contact form here :

Our official email:
dbugstationltd@gmail.com

Our Official What's App:
+8801703825017

Our Official Skype:
D-bug Station Limited

You can see our other item here: https://codecanyon.net/user/dbugstationltd

Required

To edit this project, you must have Flutter and Dart successfully installed and configured on your machine. Install flutter Set up your editor Install a fileExstantion Flutter و Dart

Start

Download and unzip the fileapp Flutter, Use your preferred IDE(Android Studio / Visual Code / IntelliJ) to open the project.

Config Android

Import Project

Extract

.zip
, the project location inside
android_studio
folder.

When your Android Studio you download from Codecanyon, you will see some files and folders. We named the project folder “ ready you can open it and you will see Select

"Open"
. a display like this

Package Name

Step 1

  • GO to
    AndroidManifest.xml
    and copy package
  • Select the indicated position and then left-click on your mouse to advance to the next step.
  • Select replace in File
  • Write your package name on pointed position.
  • then click Replace All
  • Note :

  • Flutter App Change Package Name(video)
  • Generate google-services.json

    Before you do step change the package name, you must do this step for firebase project configuration

    Please note : this step is mandatory to generate

    google-services.json
    file

    Visit Firebase Console

    Please register or log in first and then select create new project. In the dialog window enter the name of the project that will be created and the contents of the state and then click the create project to continue.

    After successfully creating a project on Firebase then the page will be redirected to the dashboard project that has been made.

    Then on the dashboard Firebase select Add Firebase to your Android app. In the next dialog window enter the name of the Android application package and SHA1 of fingerprints Certificate (optional).

    Next will download the configuration file json

    google-services.json
    automatically, which will be added in the directory app in the Android project.

  • Now copy
    google-services.json
  • Go →
    android[.....]
    app
  • select app and paste here
    google-services.json
  • Server Connection

    When your admin panel is already configured properly, you can connect it to your Flutter app, select Project

    lib/utils/Constant.dart
    , and put your admin panel
    URL
    and
    API key
    in the
    ADMIN_PANEL_URL & API_KEY
    string tag for server connection and security purpose.

    Example :

  • your url is
    https://test_url.com/path1/path2/public/admin
  • Insert on ADMIN_PANEL_URL
    'https://test_url.com'
  • How to know what is your

    ADMIN_PANEL_PATH
    ?

  • condition 1
    https://test_url.com
    and
    /public/admin
    between 2 of them which part is left that is your
    ADMIN_PANEL_PATH
  • Insert on ADMIN_PANEL_PATH
    '/path1/path2'
  • condition 2 if nothing left
  • Insert on ADMIN_PANEL_PATH
    ''
  • Ad Network

    go there and change those from the admin panel Settings Tab will be avail to change those ads unit

    Click

    Update

    Also insert

    Open Ads and Admob APP ID
    here

    Setup Settings URLs

    and also change the privacy policy, terms, faq, and feedback URLs

    Change App Name

  • Go →
    AndroidManifest.xml
    and change
    android:label
  • Change App Logo

    1- Create your application iconic_launcher Files How to create an app icon?After creating the symbols file, replace the following files:

    • /mipmap-hdpi in /android/app/src/main/res/ folder
    • /mipmap-mdpi in /android/app/src/main/res/ folder
    • /mipmap-xhdpi in /android/app/src/main/res/ folder
    • /mipmap-xxhdpi in /android/app/src/main/res/ folder
    • /mipmap-xxxhdpi in /android/app/src/main/res/ folder
    Note:
    The application icon must be renamed ic_launcher
    Another one for drawer Screen logo
  • Go →
    assets/images
    and paste your new logo.png
  • Note:
    Image name must be exactly the same
    (logo.png)

    Change App Splash

  • Go →
    assets/images
    and paste your new splash.png
  • Note:
    Image name must be exactly the same
    (splash.png)

  • After that Go →
    Terminal
    copy → paste → enter the given lines one by one
  • 1. flutter clean
    2. flutter pub get
    3. flutter pub run flutter_native_splash:create
    Image 1
    Image 1 Image 2

    Get dependencies

    And just run the following command

    flutter pub get

    Admin Panel

    Getting Started

    Before doing the installation, you need to do the following things :

    Have a web hosting to store admin panel files and MySQL Database to run this admin panel, web hosting that you use must have the following requirements :

  • PHP Version =>7.2
  • bcMath PHP Extensions
  • Ctype
  • PHP Extensions
  • Fileinfo
  • PHP Extensions
  • mbString
  • PHP Extensions
  • open ssl
  • PHP Extensions
  • PDO
  • PHP Extensions
  • tokenizer
  • PHP Extensions
  • xml
  • PHP Extensions
  • json
  • PHP Extensions
  • curl
  • PHP Extensions
  • http
  • PHP Extensions
  • Support .htaccess
  • Support MySQL
  • Apache Server (Install PuTTY)
  • Hosting with VPS
  • Support WinSCP (Install this software)
  • Install Composer Latest version
  • Because this documentation uses VPS, web hosting with VPS is recommended. If you don’t have web hosting or a domain, you can check on this sample site which provides hosting and domain service: For Hosting Purchasing we recommended:

    1.

    Hostinger

    You can sign up using our referral link and get 100usd free credit for 60 days period.

    Login first with your valid

    Email
    and
    Password

    Click on

    manage
    to enter your file manager.

    Click on

    File Manager

    Go to public_html to upload your project.

    Note:
    If there is no public_html folder then create new one with name public_html.

    Upload a your

    laravel script.zip
    file and unzip the project.

    After unzip project go to unzipped folder to setup project environment.

    Click

    .env
    to edit environment and add your database credentials.

    Put here your database name, database user name database password.

    Create Database

    This is for Cpanel

    1. Click

    Database
    to create a database

    Fill up the form to create a database.

    Click Enter

    phpMyadmin
    to go to phpMyadmin

    Login with the database credentials which you have just created few time ago.

    Select your database and import database file which you can find inside your project folder as named DB backup folder

    Import Database

    This is for Cpanel

    Select your database and import database file which you can find inside your project folder as named DB backup folder example.sql file.

    Upload PHP Script's

    Go to public_html to upload your project.

    Upload a your

    laravel script.zip
    file and unzip the project.

    After unzip project go to unzipped folder to setup project environment.

    Click

    .env
    to edit environment and add your database credentials.

    Put here your database name, database user name database password.

    Migrate from Older Version

    v3.x.x to v4.0.0

    This guide is for you who want to migrate from

    older version (v3.4.x)
    to
    latest version (v4.0.0)
    without losing your previous data, but, to avoid unexpected data loss, we recommend that you backup your data before doing this step, this step is for the
    admin panel
    as server side.

    Update Database

    1. Login to your cpanel hosting, open

    PhpMyAdmin

    2. Select your database and make update by inserting SQL query function on below :

    Query
    CREATE TABLE `tbl_license` (
    `id` INT NOT NULL AUTO_INCREMENT,
    `purchase_code` VARCHAR(255) NOT NULL,
    `item_id` INT NOT NULL,
    `item_name` VARCHAR(255) NOT NULL,
    `buyer` VARCHAR(255) NOT NULL,
    `license_type` VARCHAR(45) NOT NULL,
    `purchase_date` VARCHAR(255) NOT NULL,
    PRIMARY KEY (`id`)
    ) ENGINE = InnoDB;
    Update PHP Script

    1. Login to your cpanel hosting, open

    File Manager

    2. Navigate to the directory where you put the php admin panel code

    3.

    Delete All Old PHP Scripts and folder
    in your admin panel directory
    EXCEPT : ‘upload’
    and
    ‘includes’
    folder (Optional)

    4. After the extract process is complete, refresh it

    5. Your Admin Panel is ready to use. (Note : if you use Google Chrome, click

    “Ctrl + F5”
    to reload the Admin Panel page).

    v4.0.0 to v4.1.0

    This guide is for you who want to migrate from

    older version (v4.0.0)
    to
    latest version (v4.1.0)
    without losing your previous data, but, to avoid unexpected data loss, we recommend that you backup your data before doing this step, this step is for the
    admin panel
    as server side.

    Update Database

    1. Login to your cpanel hosting, open

    PhpMyAdmin

    2. Select your database and click SQL tab menu

    3.

    Copy
    and
    Paste
    for each
    Query
    on below and click
    Go

    4. make update by inserting SQL query function starting from

    Query 1 - 3

    CREATE TABLE `tbl_ads` (
      `id` INT NOT NULL AUTO_INCREMENT,
      `ad_status` varchar(5) NOT NULL DEFAULT 'on',
      `ad_type` varchar(45) NOT NULL DEFAULT 'admob',
      `admob_publisher_id` varchar(45) NOT NULL DEFAULT '0',
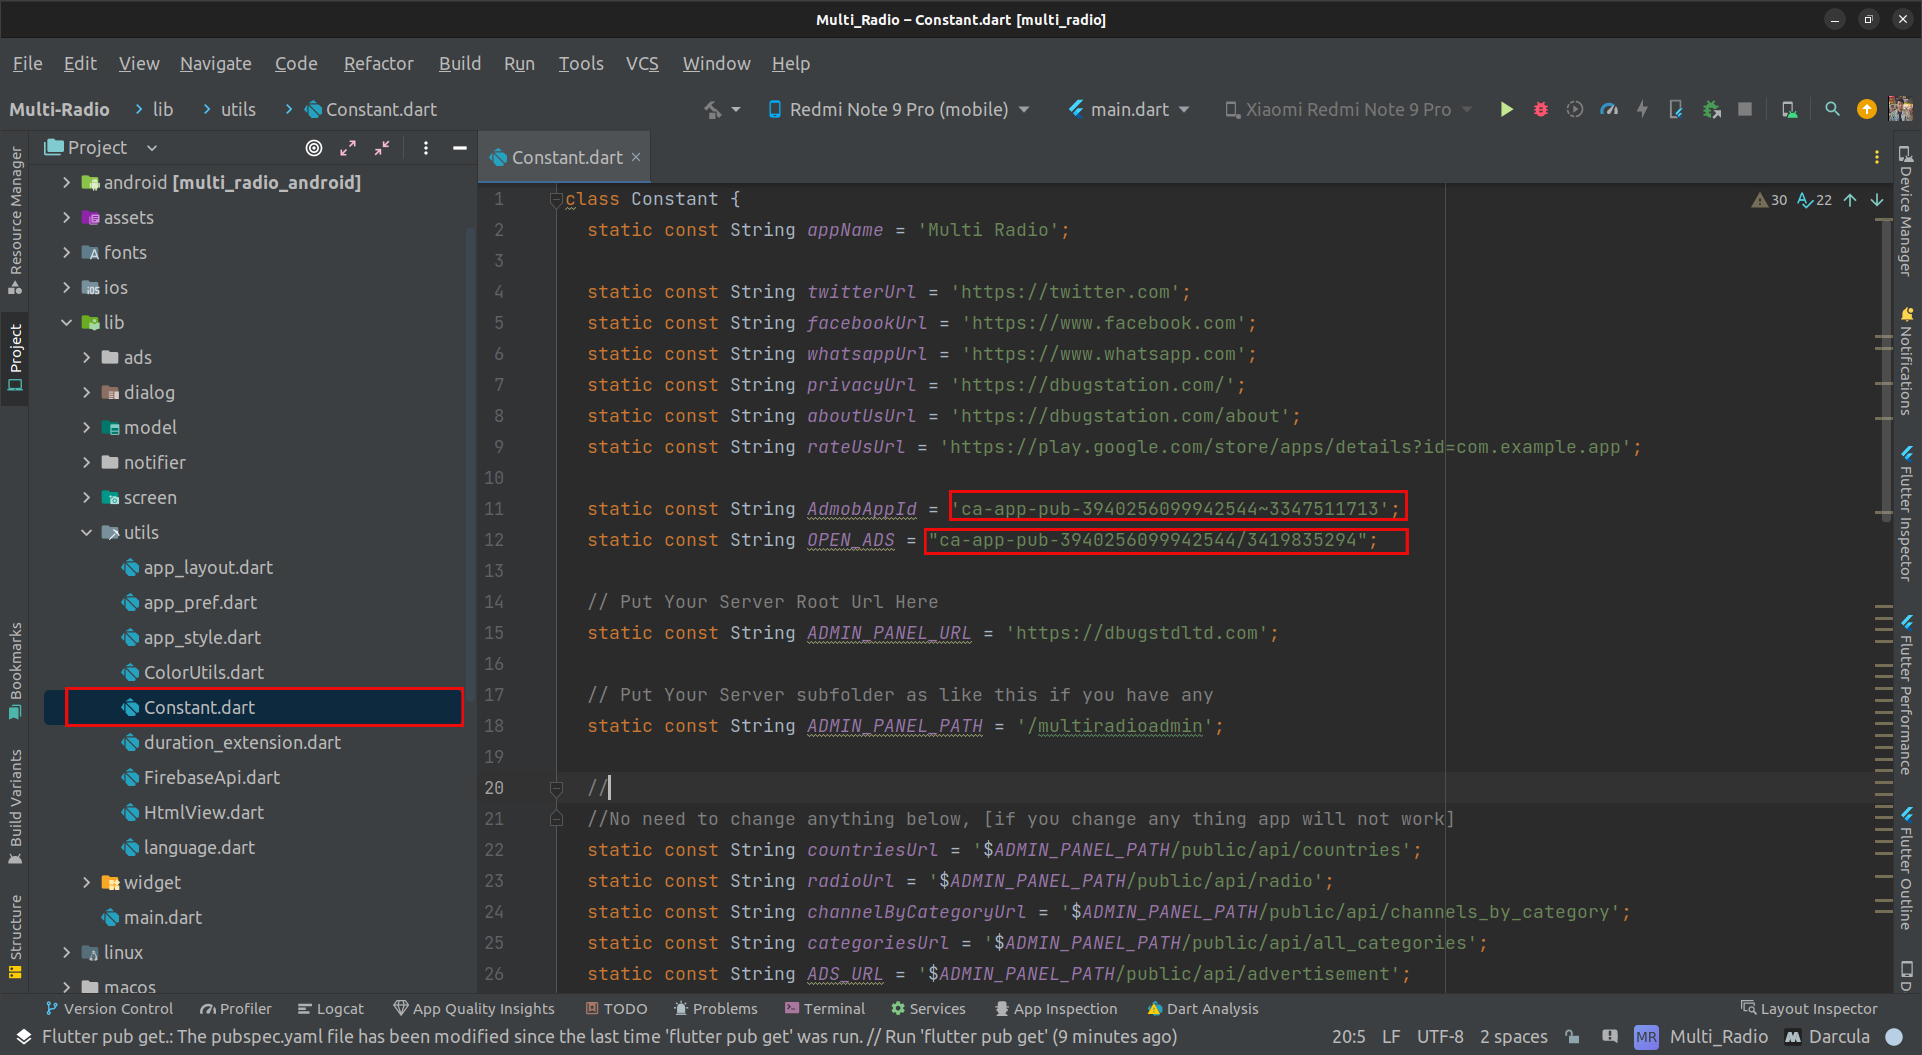
      `admob_app_id` varchar(255) NOT NULL DEFAULT '0',
      `admob_banner_unit_id` varchar(255) NOT NULL DEFAULT '0',
      `admob_interstitial_unit_id` varchar(255) NOT NULL DEFAULT '0',
      `admob_native_unit_id` varchar(255) NOT NULL DEFAULT '0',
      `fan_banner_unit_id` varchar(255) NOT NULL DEFAULT '0',
      `fan_interstitial_unit_id` varchar(255) NOT NULL DEFAULT '0',
      `fan_native_unit_id` varchar(255) NOT NULL DEFAULT '0',
      `startapp_app_id` varchar(255) NOT NULL DEFAULT '0',
      `interstitial_ad_interval` int(11) NOT NULL DEFAULT '3',
      `native_ad_interval` int(11) NOT NULL DEFAULT '20',
      `native_ad_index` int(11) NOT NULL DEFAULT '4',
      `date_time` timestamp NOT NULL DEFAULT CURRENT_TIMESTAMP ON UPDATE CURRENT_TIMESTAMP,
      PRIMARY KEY (`id`)  
    ) ENGINE=InnoDB DEFAULT CHARSET=utf8mb4;
    								
    Update PHP Script

    1. Login to your cpanel hosting, open

    File Manager

    2. Navigate to the directory where you put the php admin panel code

    3.

    Delete All Old PHP Scripts and folder
    in your admin panel directory
    EXCEPT : ‘upload’
    and
    ‘includes’
    folder (Optional)

    4. After the extract process is complete, refresh it

    5. Your Admin Panel is ready to use. (Note : if you use Google Chrome, click

    “Ctrl + F5”
    to reload the Admin Panel page).

    Build APK & aab

    Run app

    1- In the target selector, select the Android device to run the app. If none are listed as available, select Tools > Android > AVD Manager and create one there. For more details, browseManaging AVDs.

    Click the Play icon in the Tools section, or call up the Play > Run menu item. Locate the main Android Studio tools section:

    2- If you do not useAndroid Studio or IntelliJ You can use the command line to run your application with the following command

    flutter run

    Build and install the application

    1- After making all your changes and modifications, save all your projects, open the console, navigate to your project file and execute the following command to build your application

    flutter build apk --release

    If you are publishing the app in the Play Store, it is recommended to use app bundles or split APK to reduce the size of the app.
    To create the application package, run:

    flutter build appbundle --target-platform android-arm,android-arm64,android-x64

    Learn more: https://developer.android.com/guide/app-bundle
    To split APKs per ABI, run:

    flutter build apk --target-platform android-arm,android-arm64,android-x64 --split-per-abi

    Learn more: https://developer.android.com/studio/build/configure-apk-splits#configure-abi-split

    You should get the apk file inbuild/output/apk file, to install your application on your connected device, follow the command below:

    flutter install

    2- If you want to upload your app to Google Play, you must sign it before uploading, generate the sign it key by running the following command:

    keytool -genkey -v -keystore android/app/key.jks -keyalg RSA -keysize 2048 -validity 10000 -alias key

    3- Open /android/key.propertiesAnd modify the following attributes to rebuild your application:

    
    storePassword=<Your Key Password>
    keyPassword=<Your Key Password>
    keyAlias=key
    storeFile=key.jks