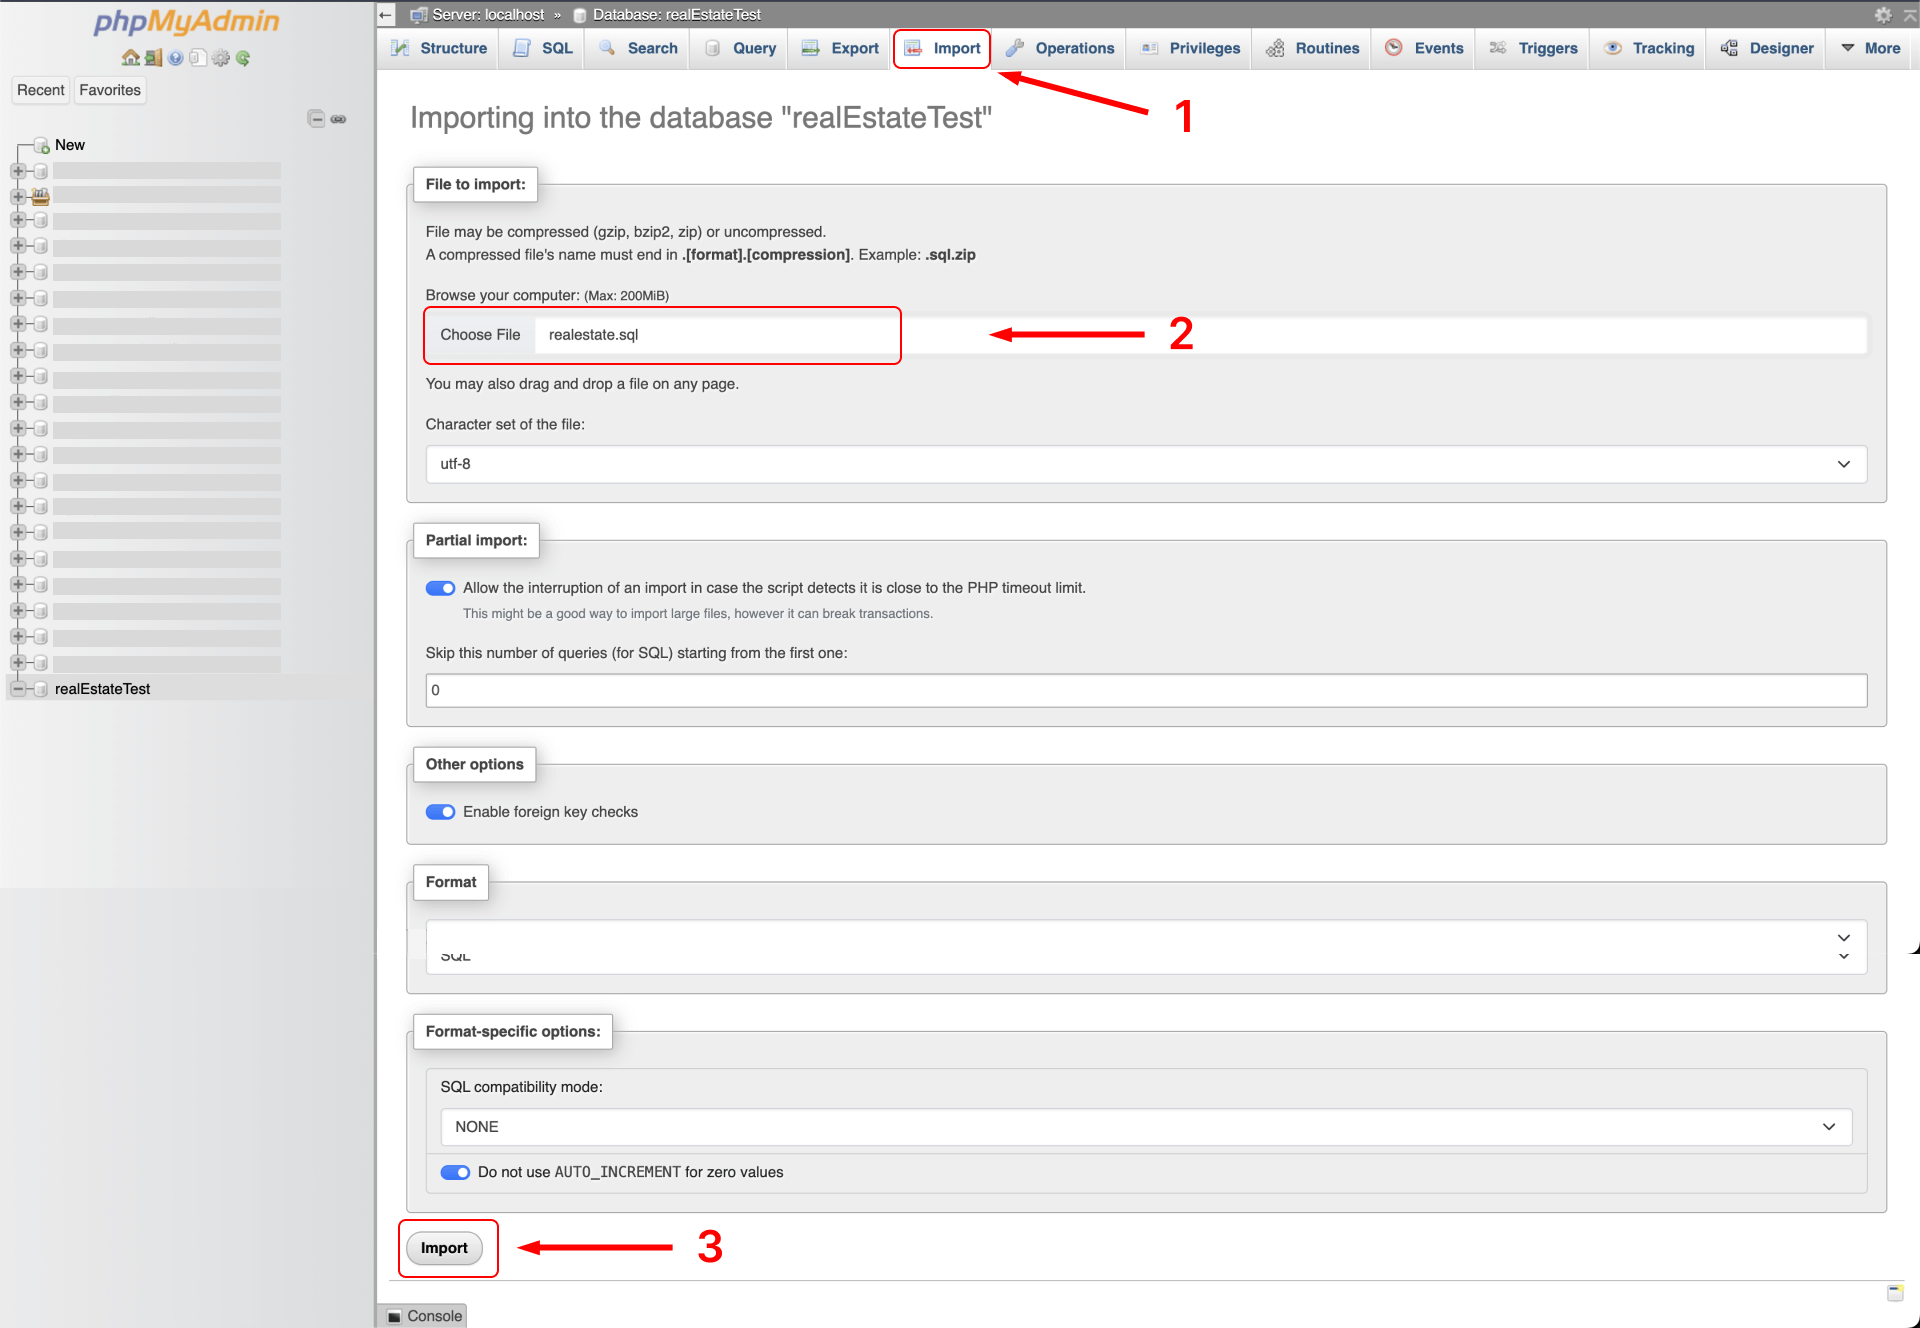
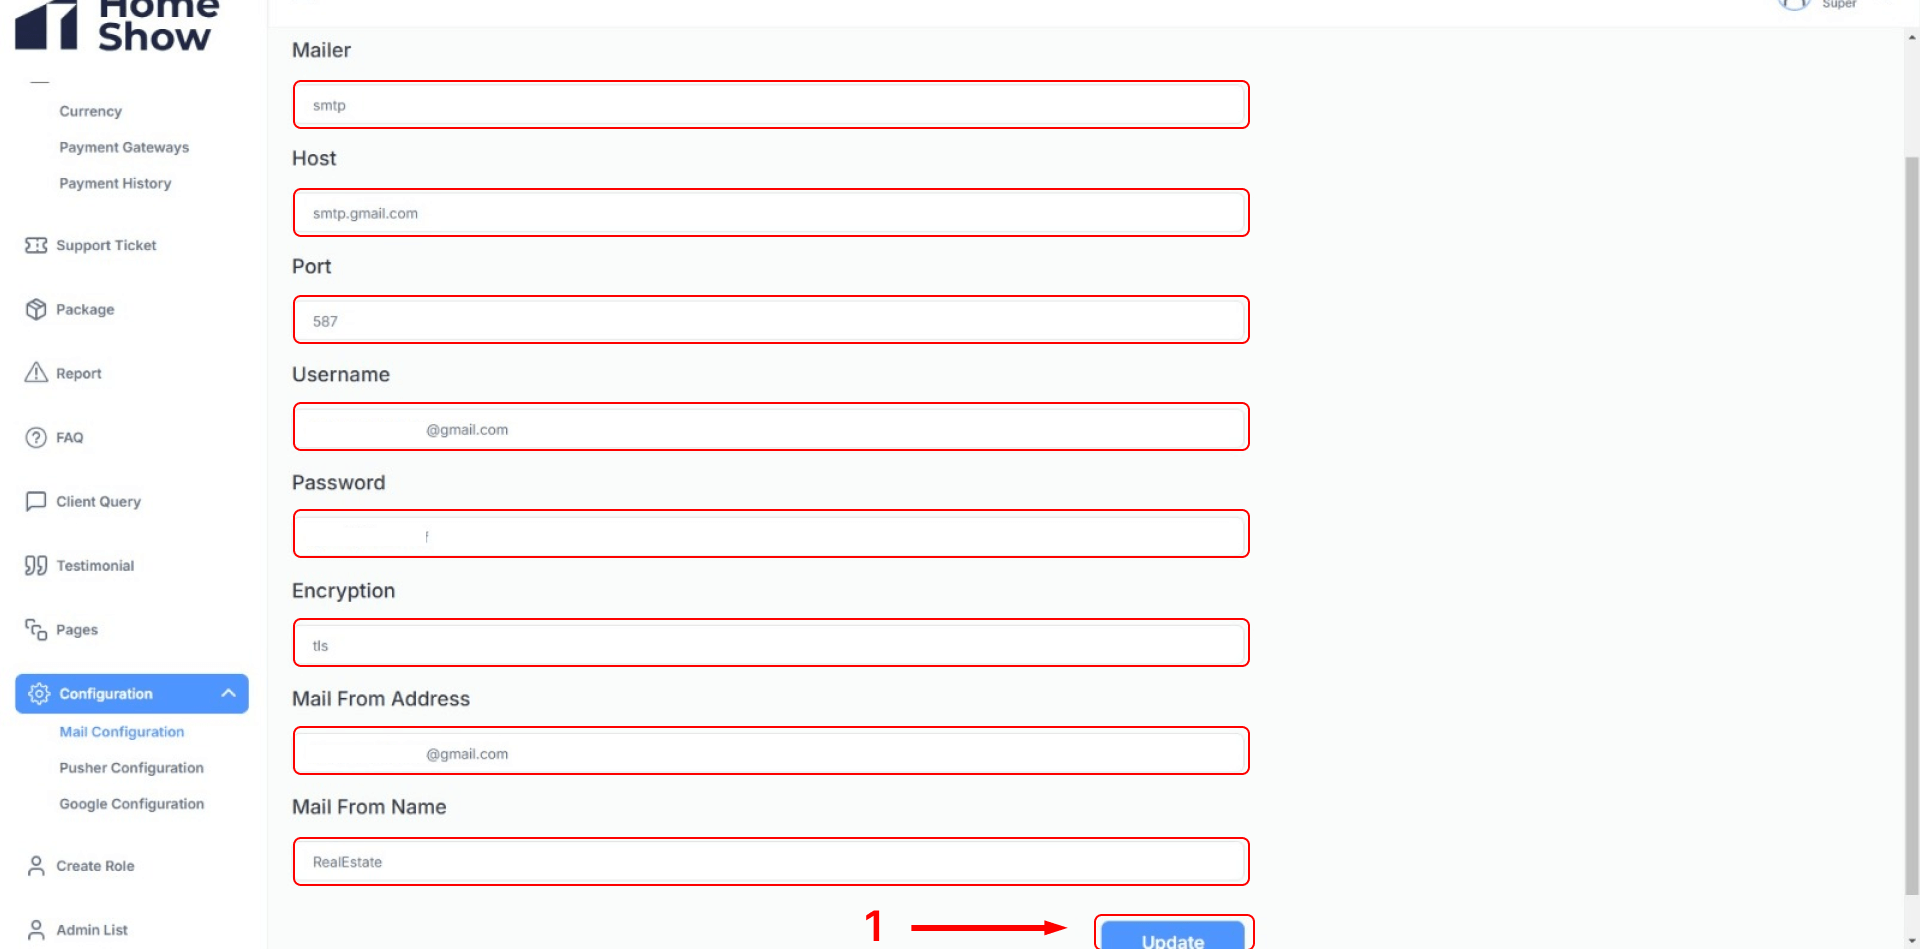
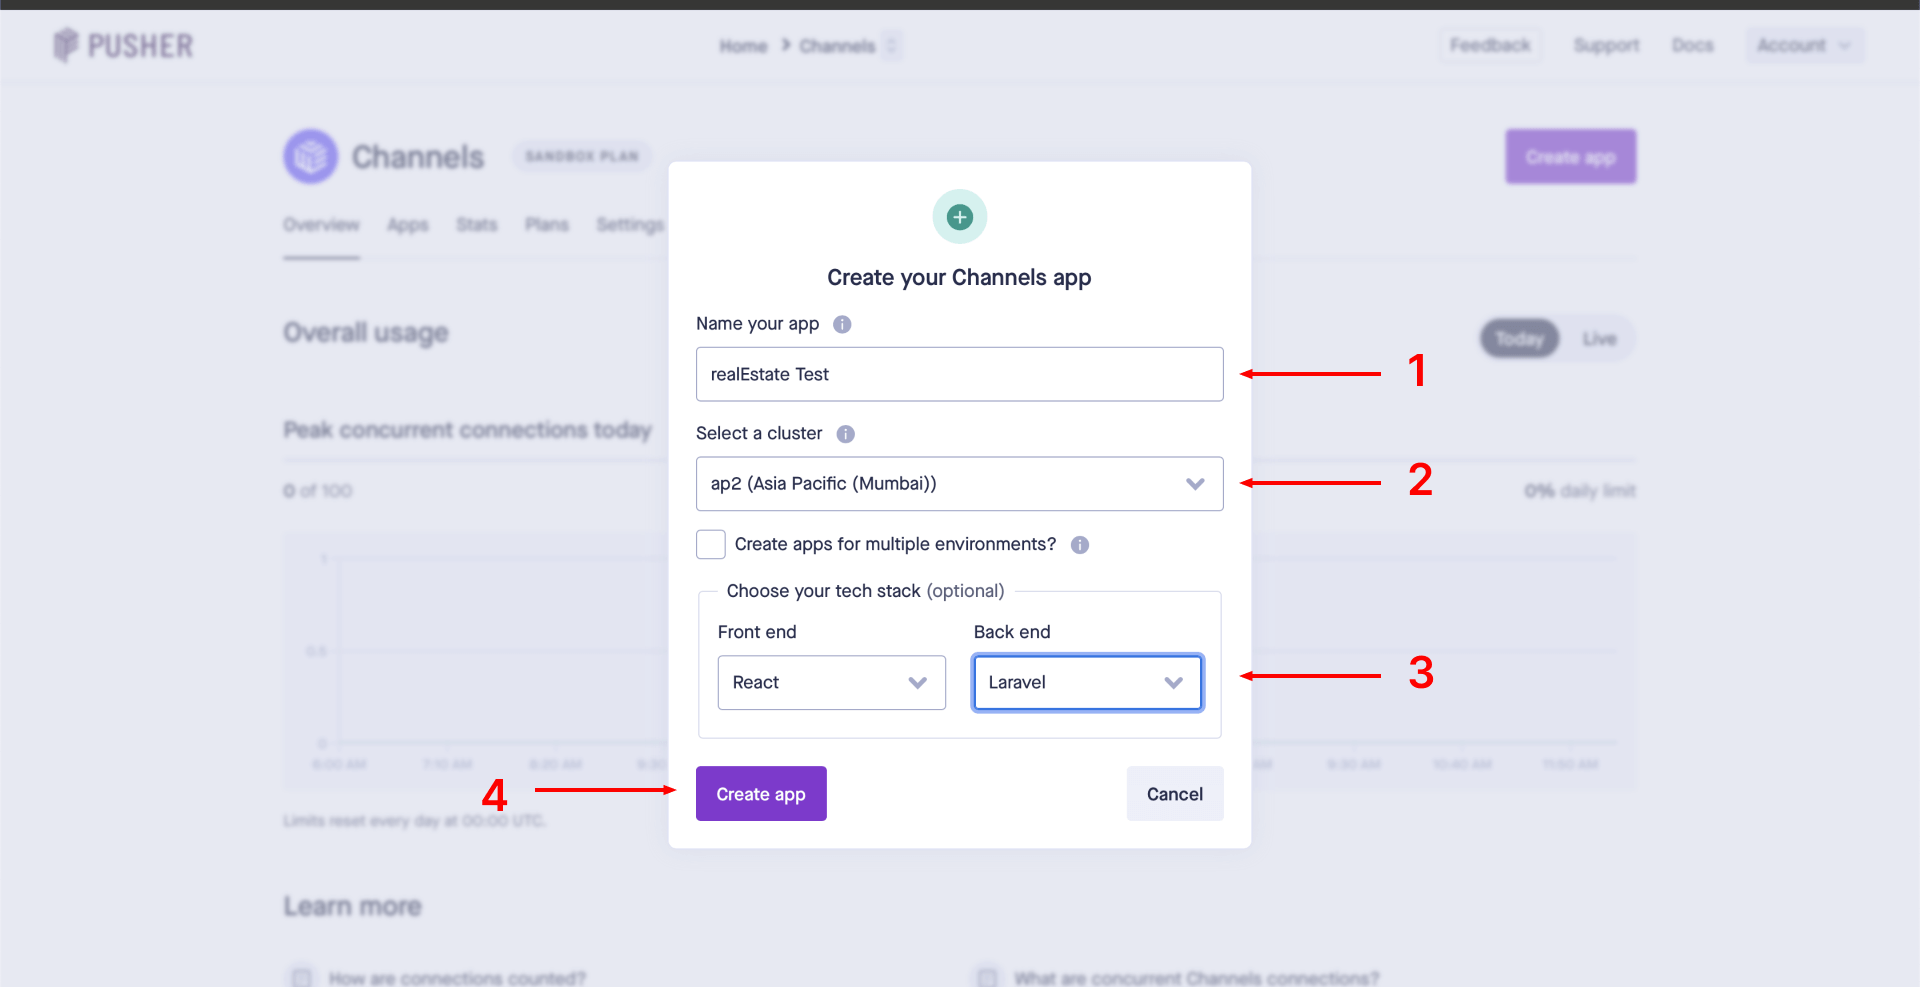
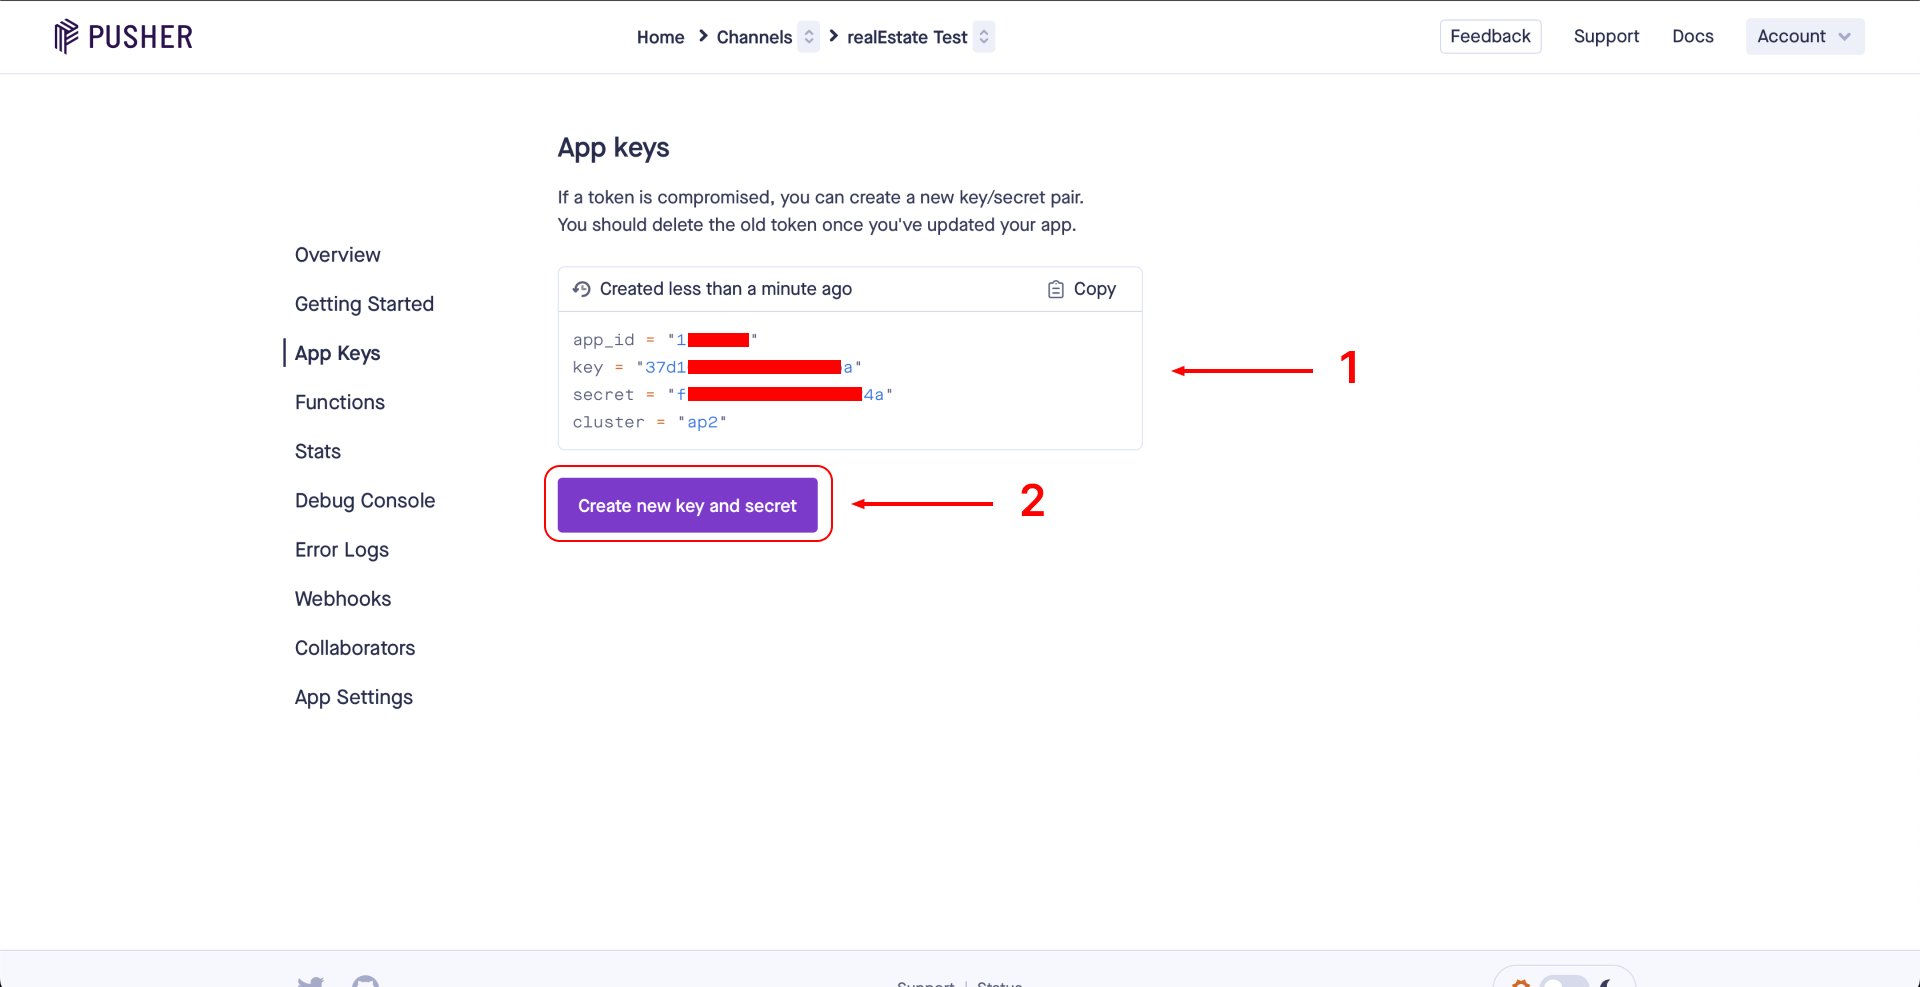
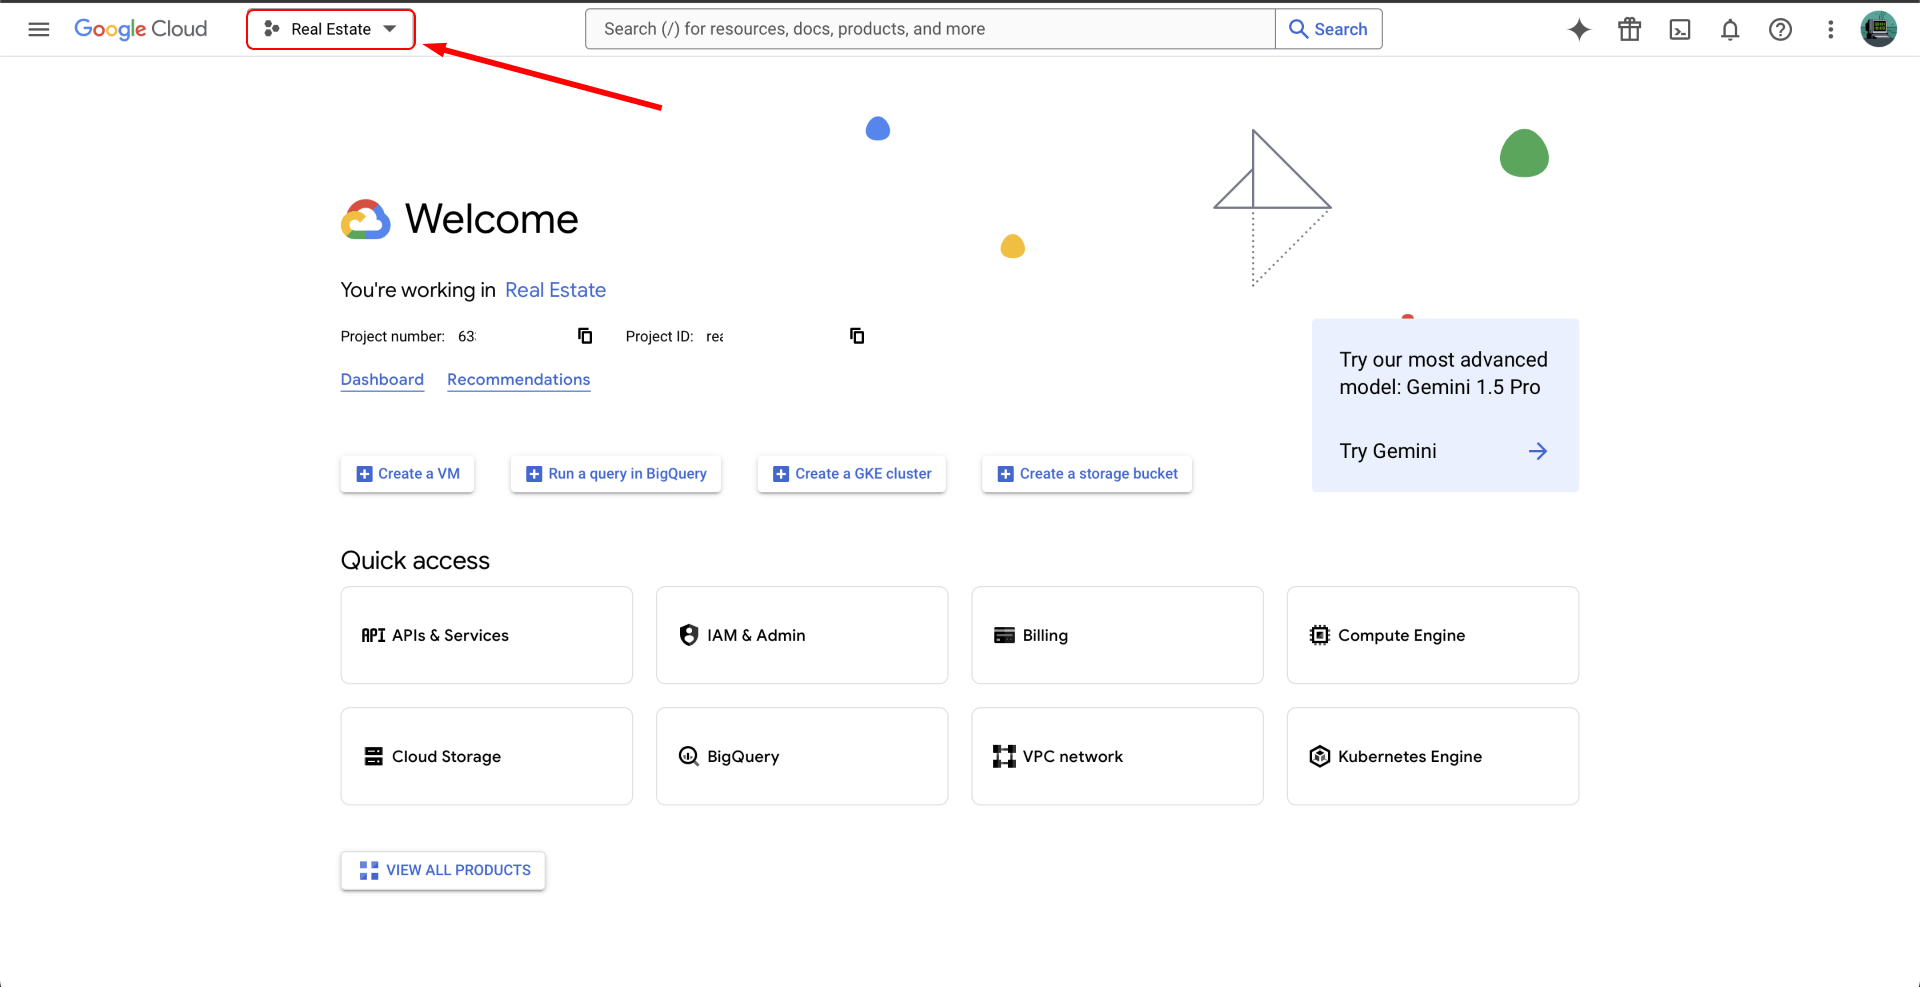
HomeShow Last updated: 2023-01-13

Thank you for purchasing our app. If you have any questions that are beyond the scope of this help file, please feel free to email via my user page contact form here :

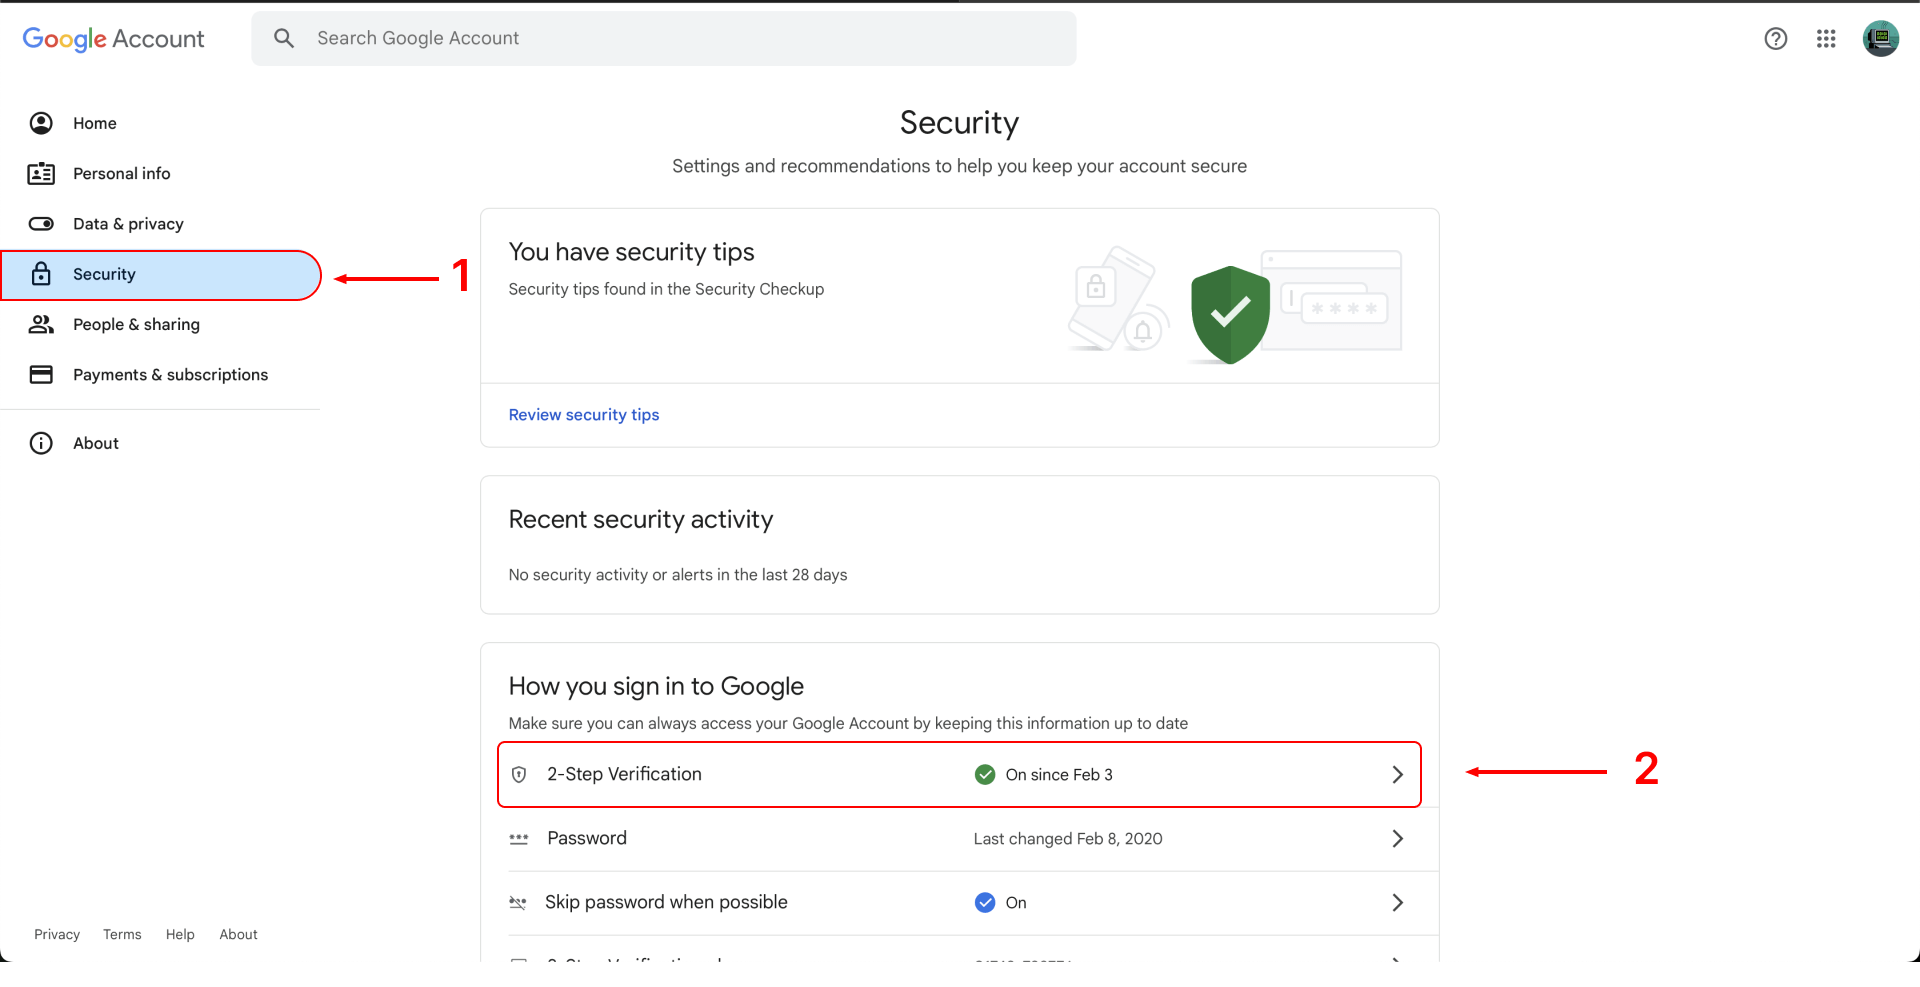
Our official email: dbugstationltd@gmail.com

Our Official What's App: +8801703825017

Our Official Skype: D-bug Station Limited

You can see our other item here: https://codecanyon.net/user/dbugstationltd
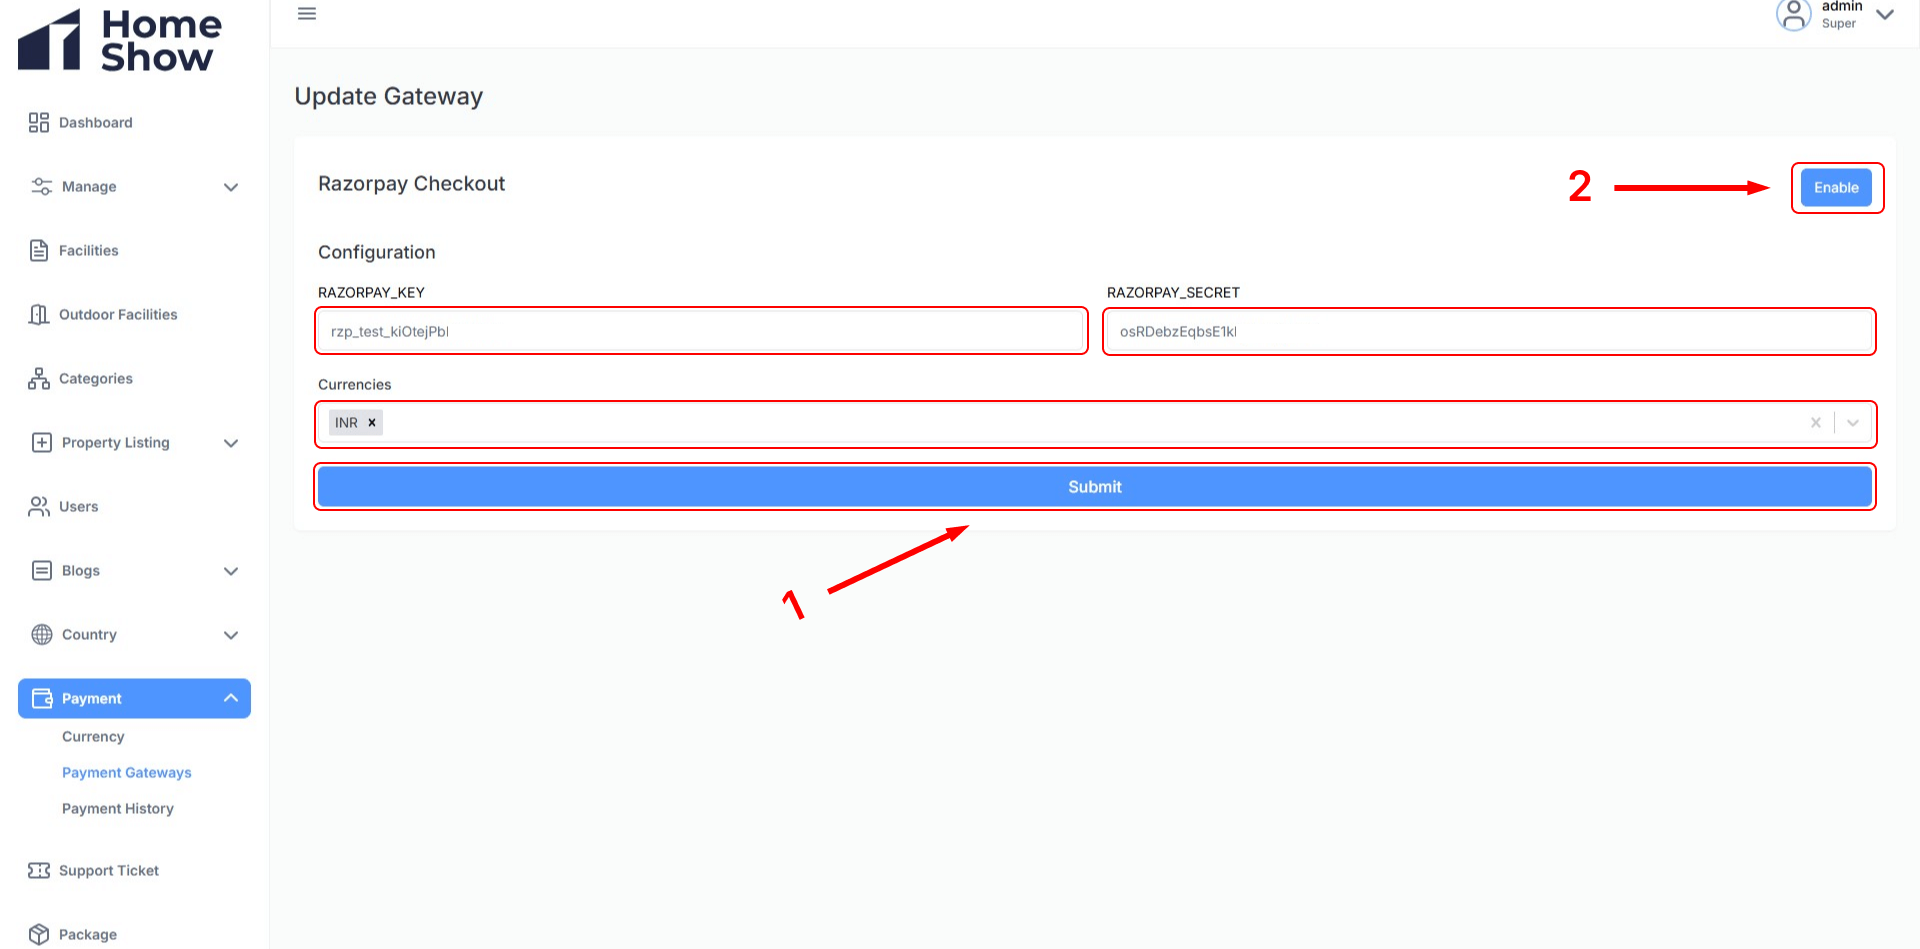
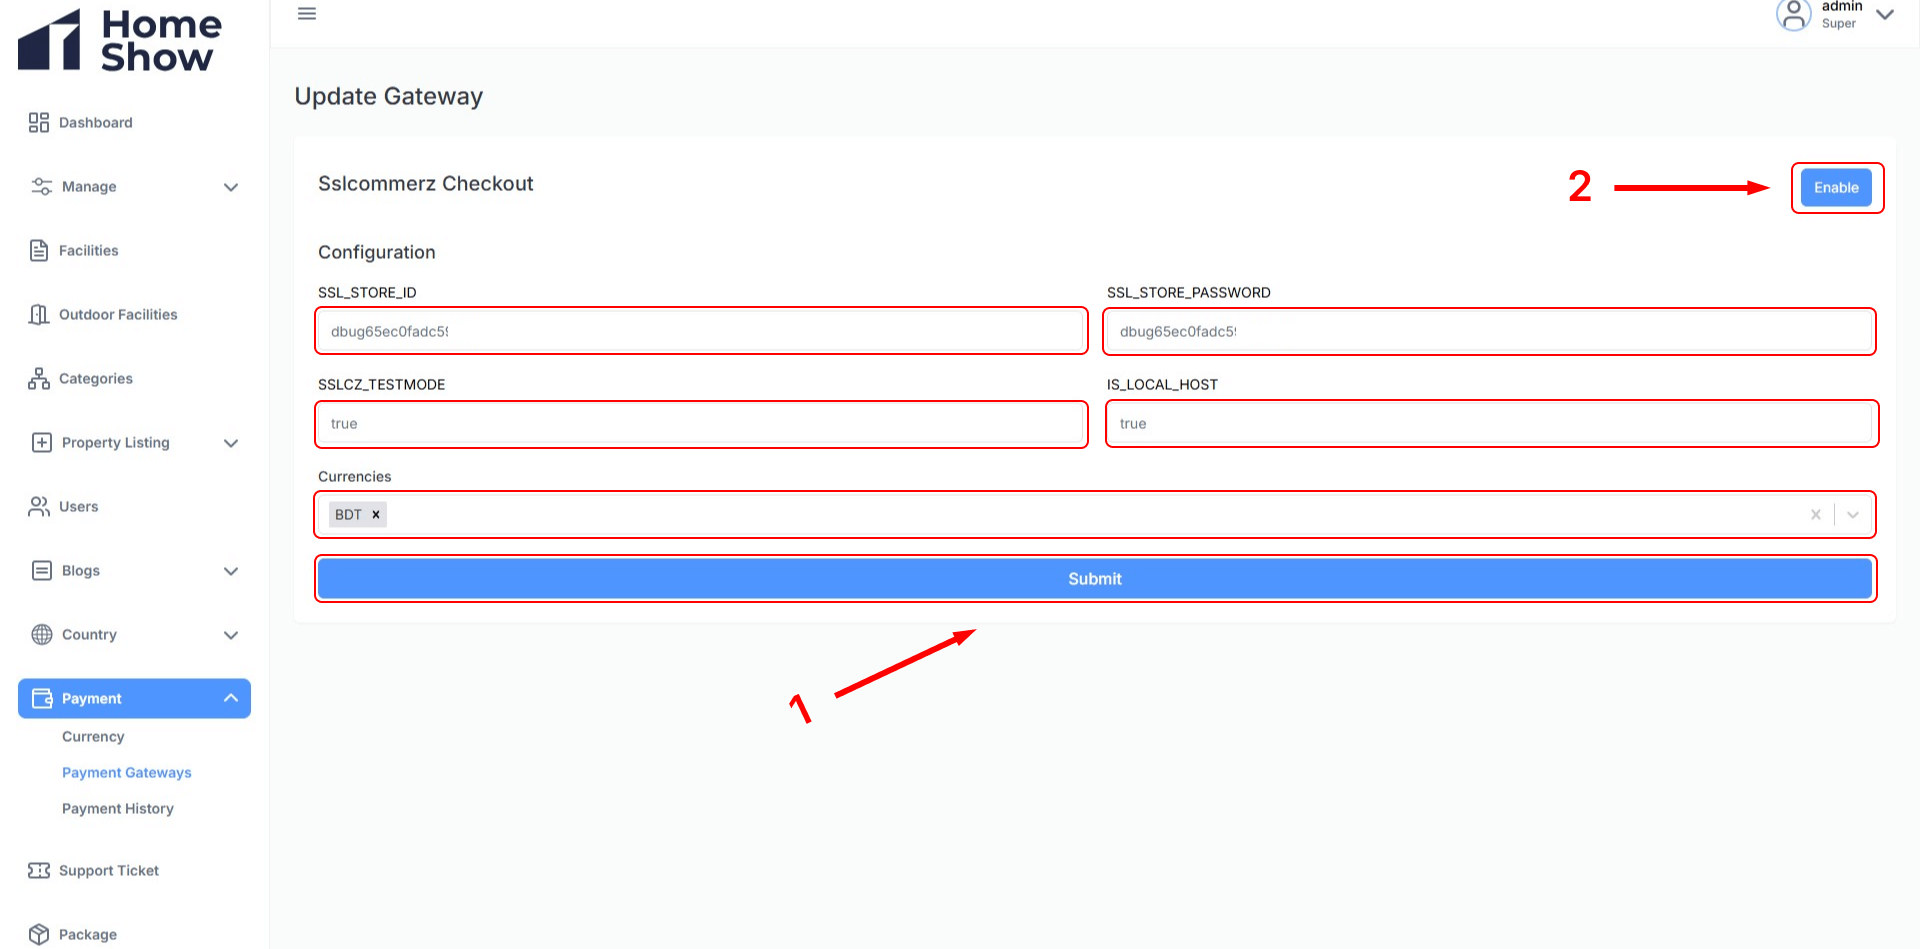
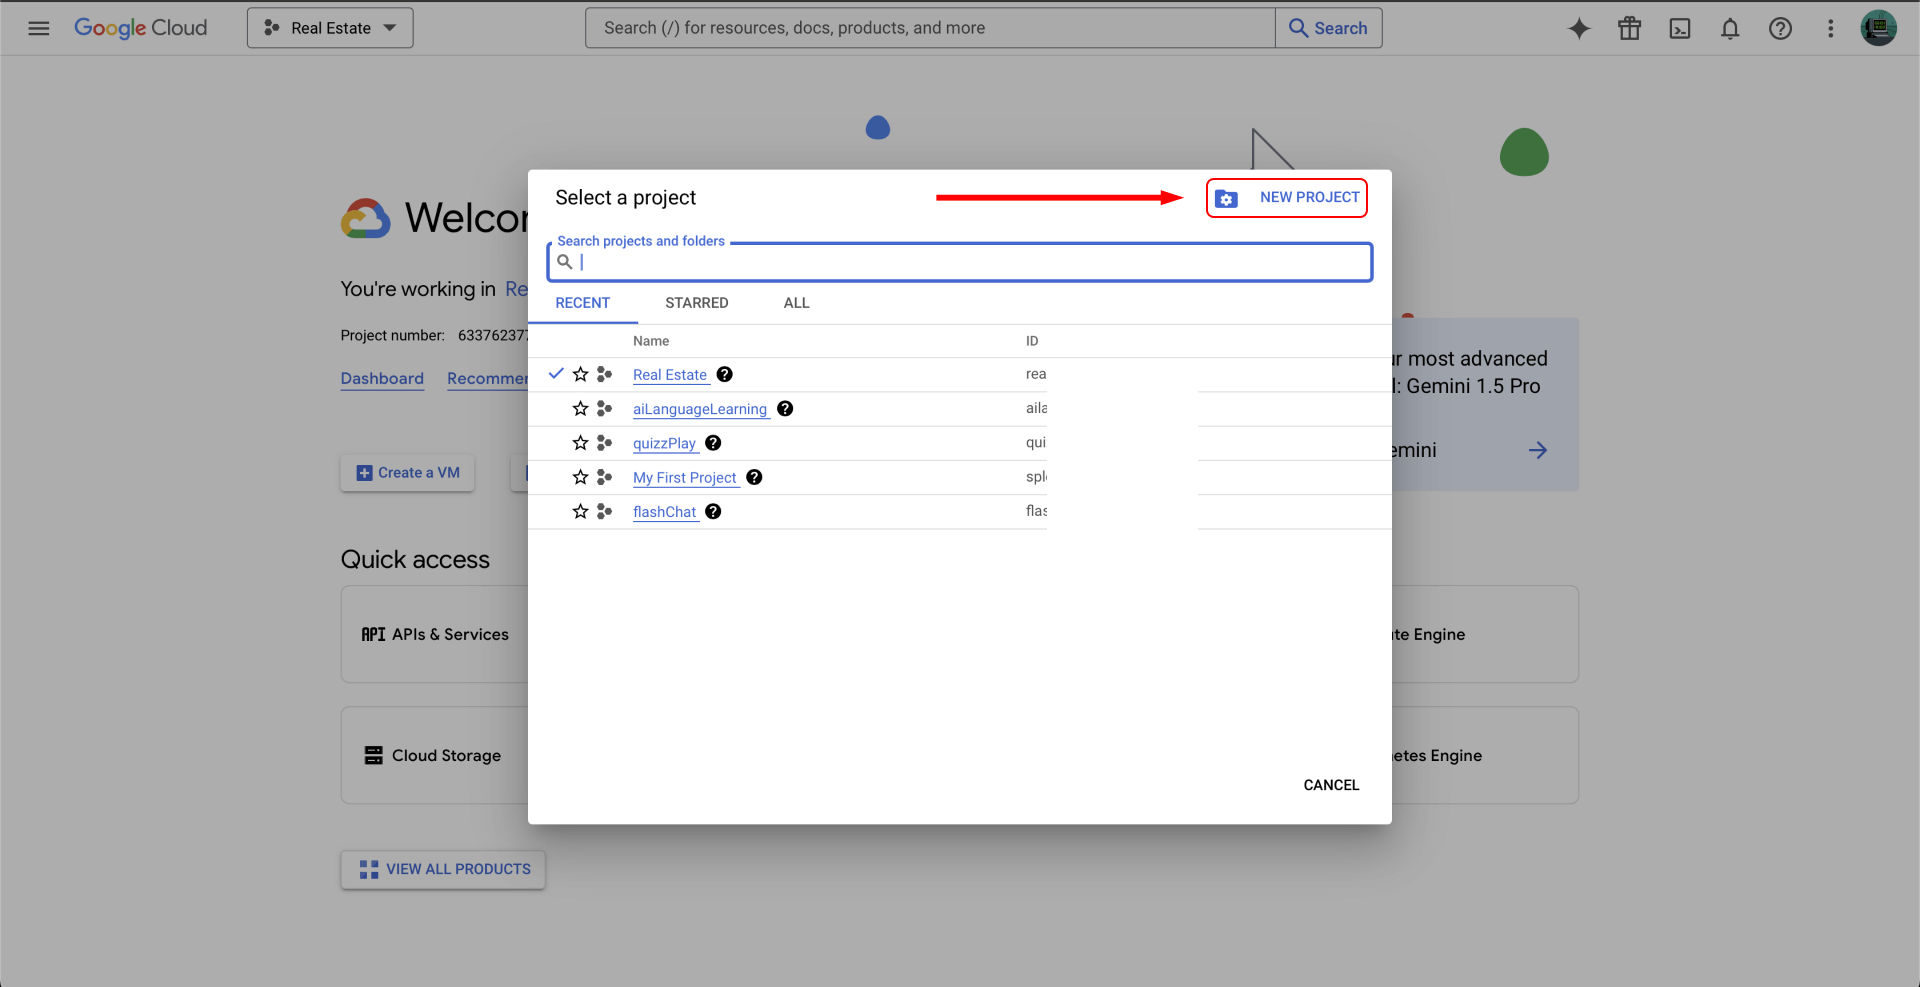
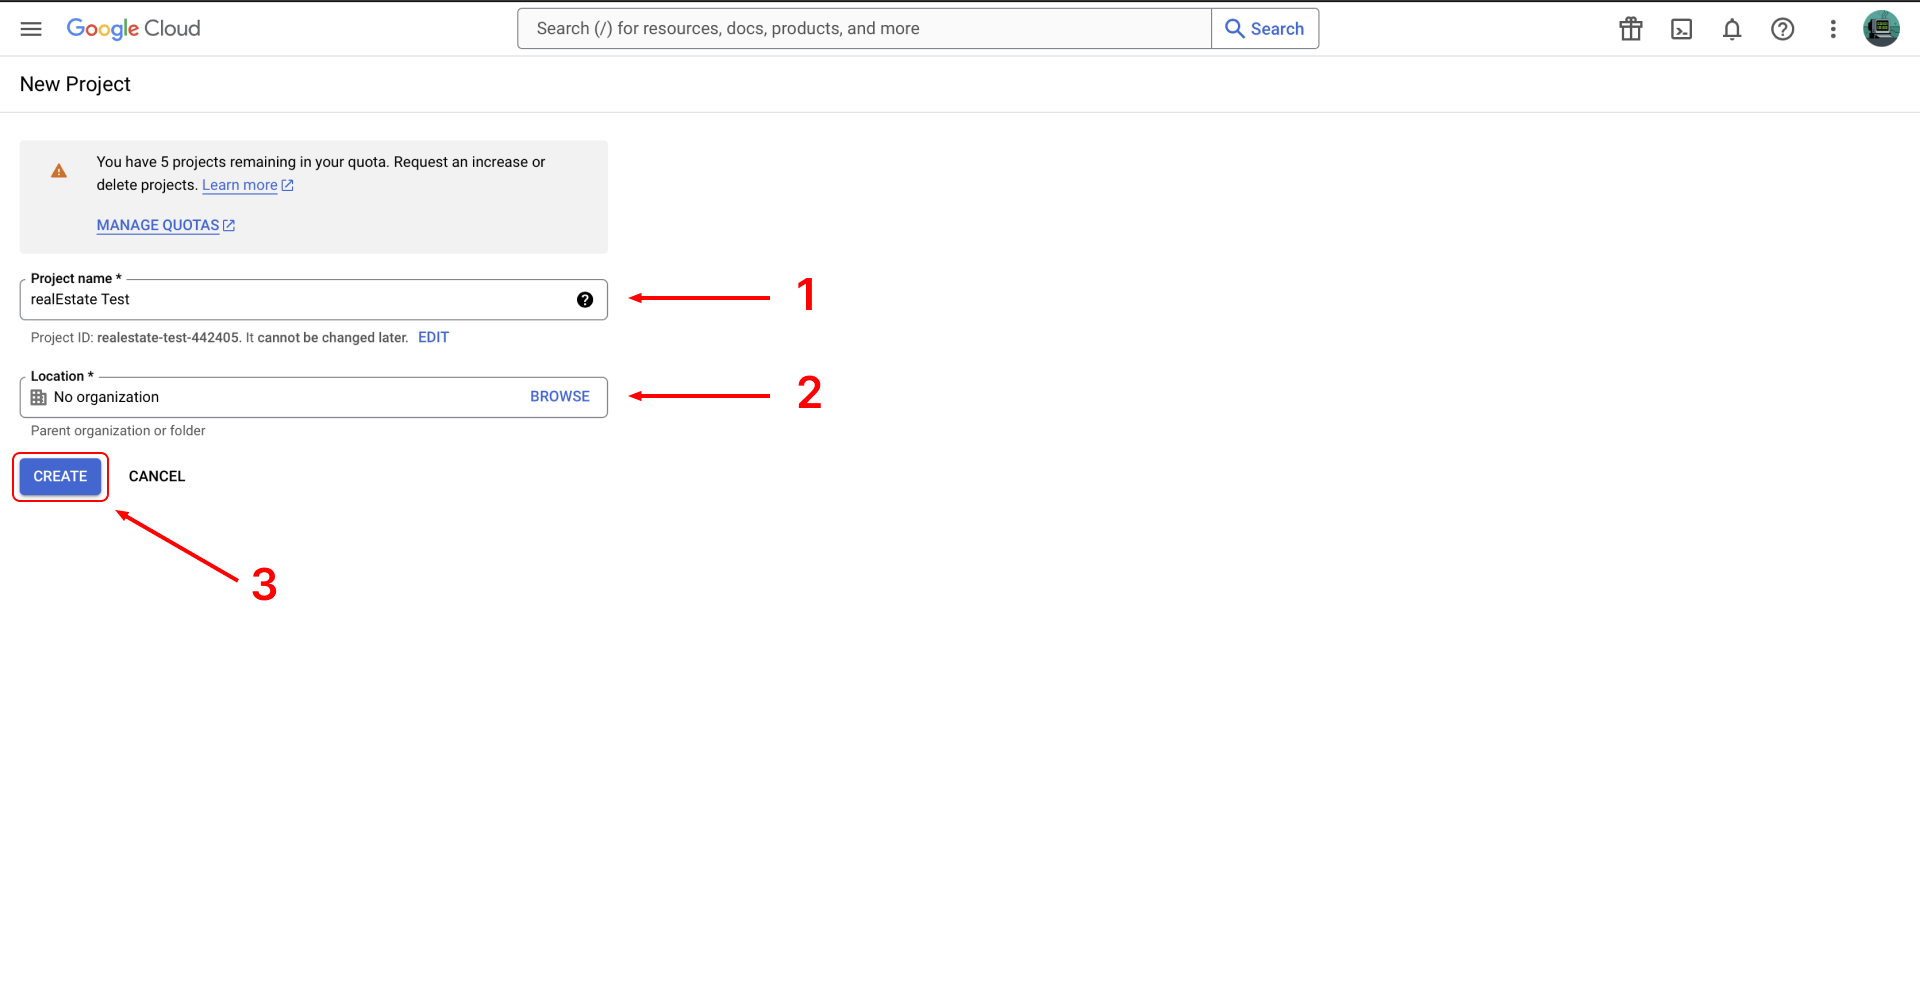
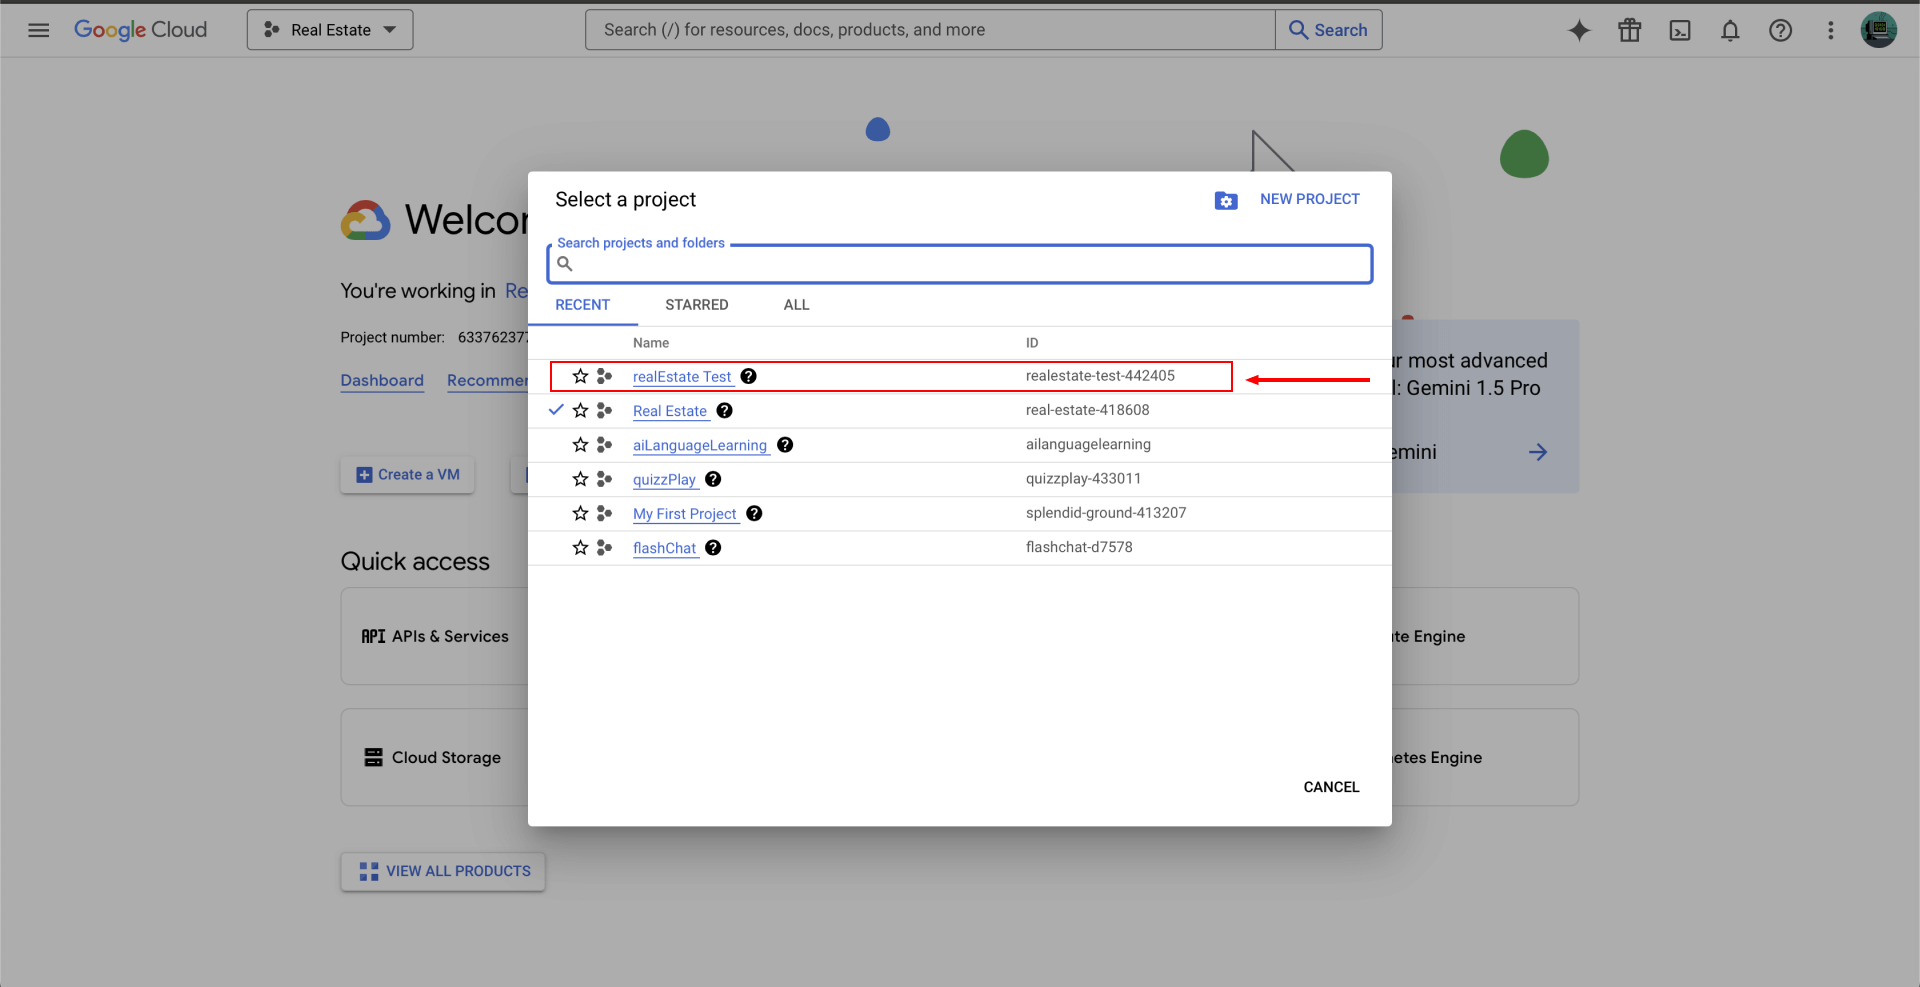
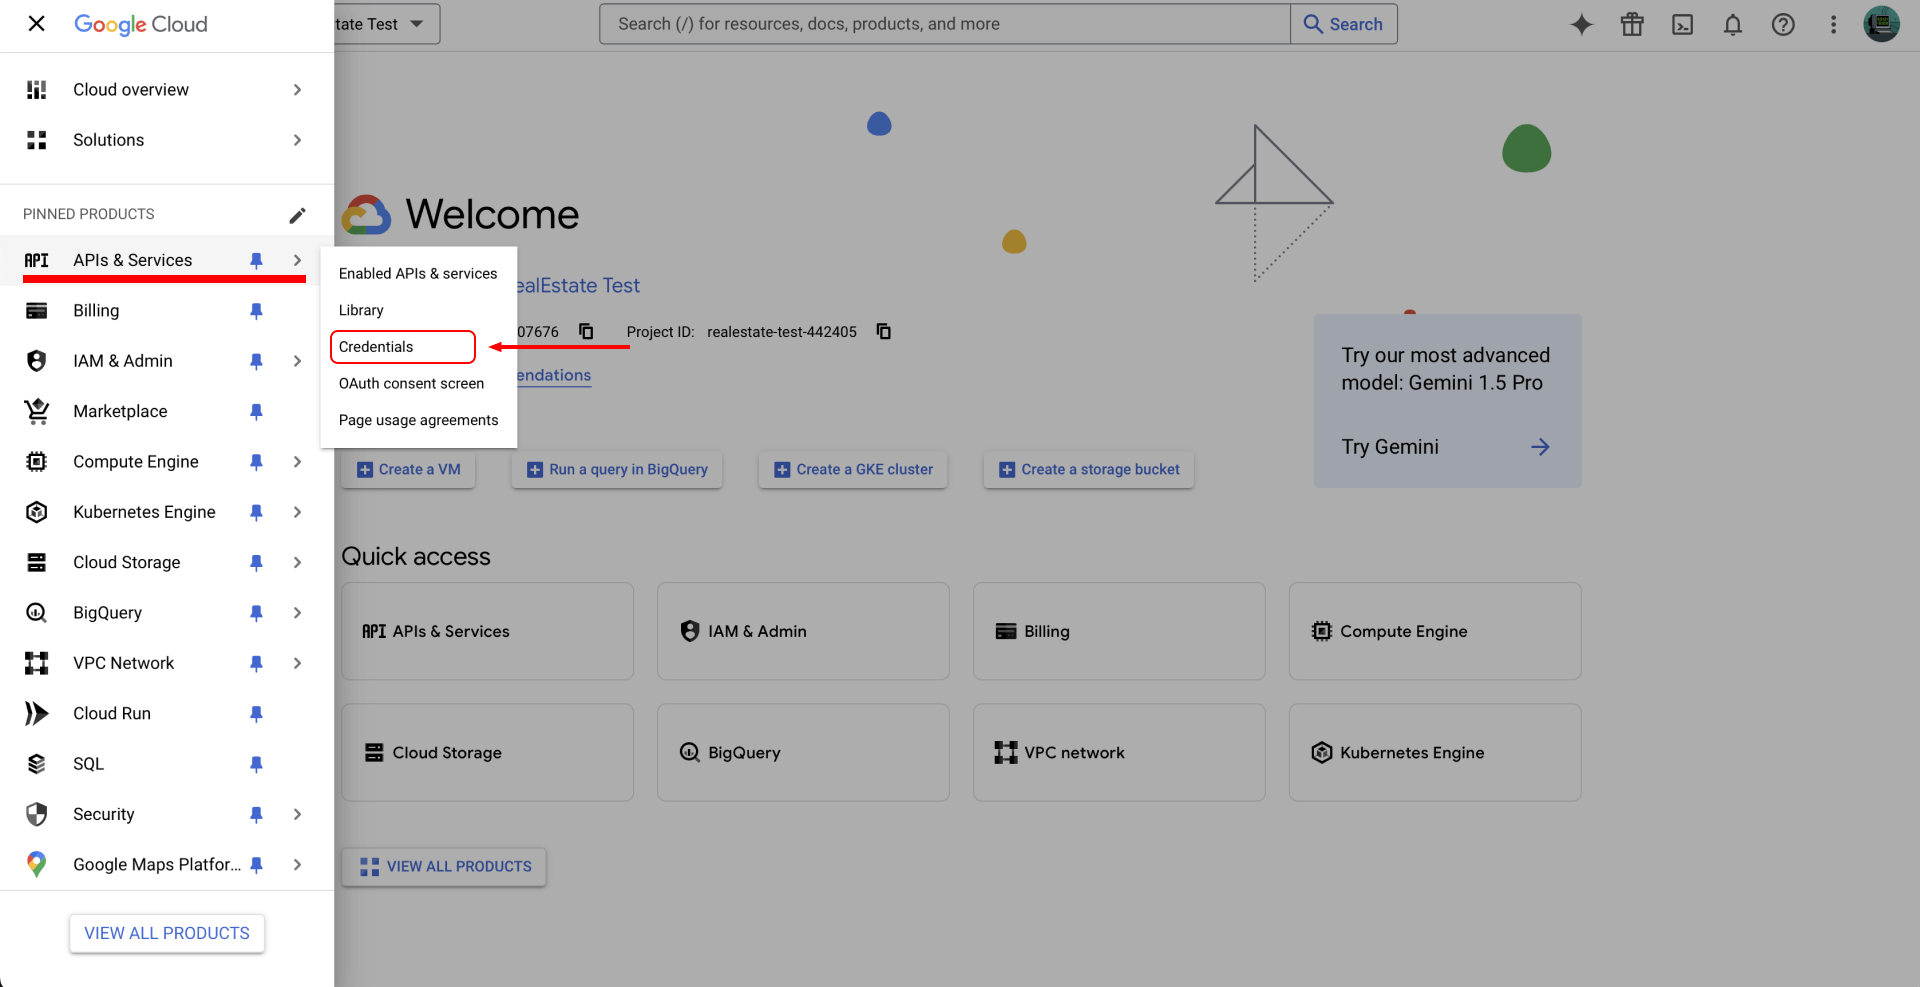
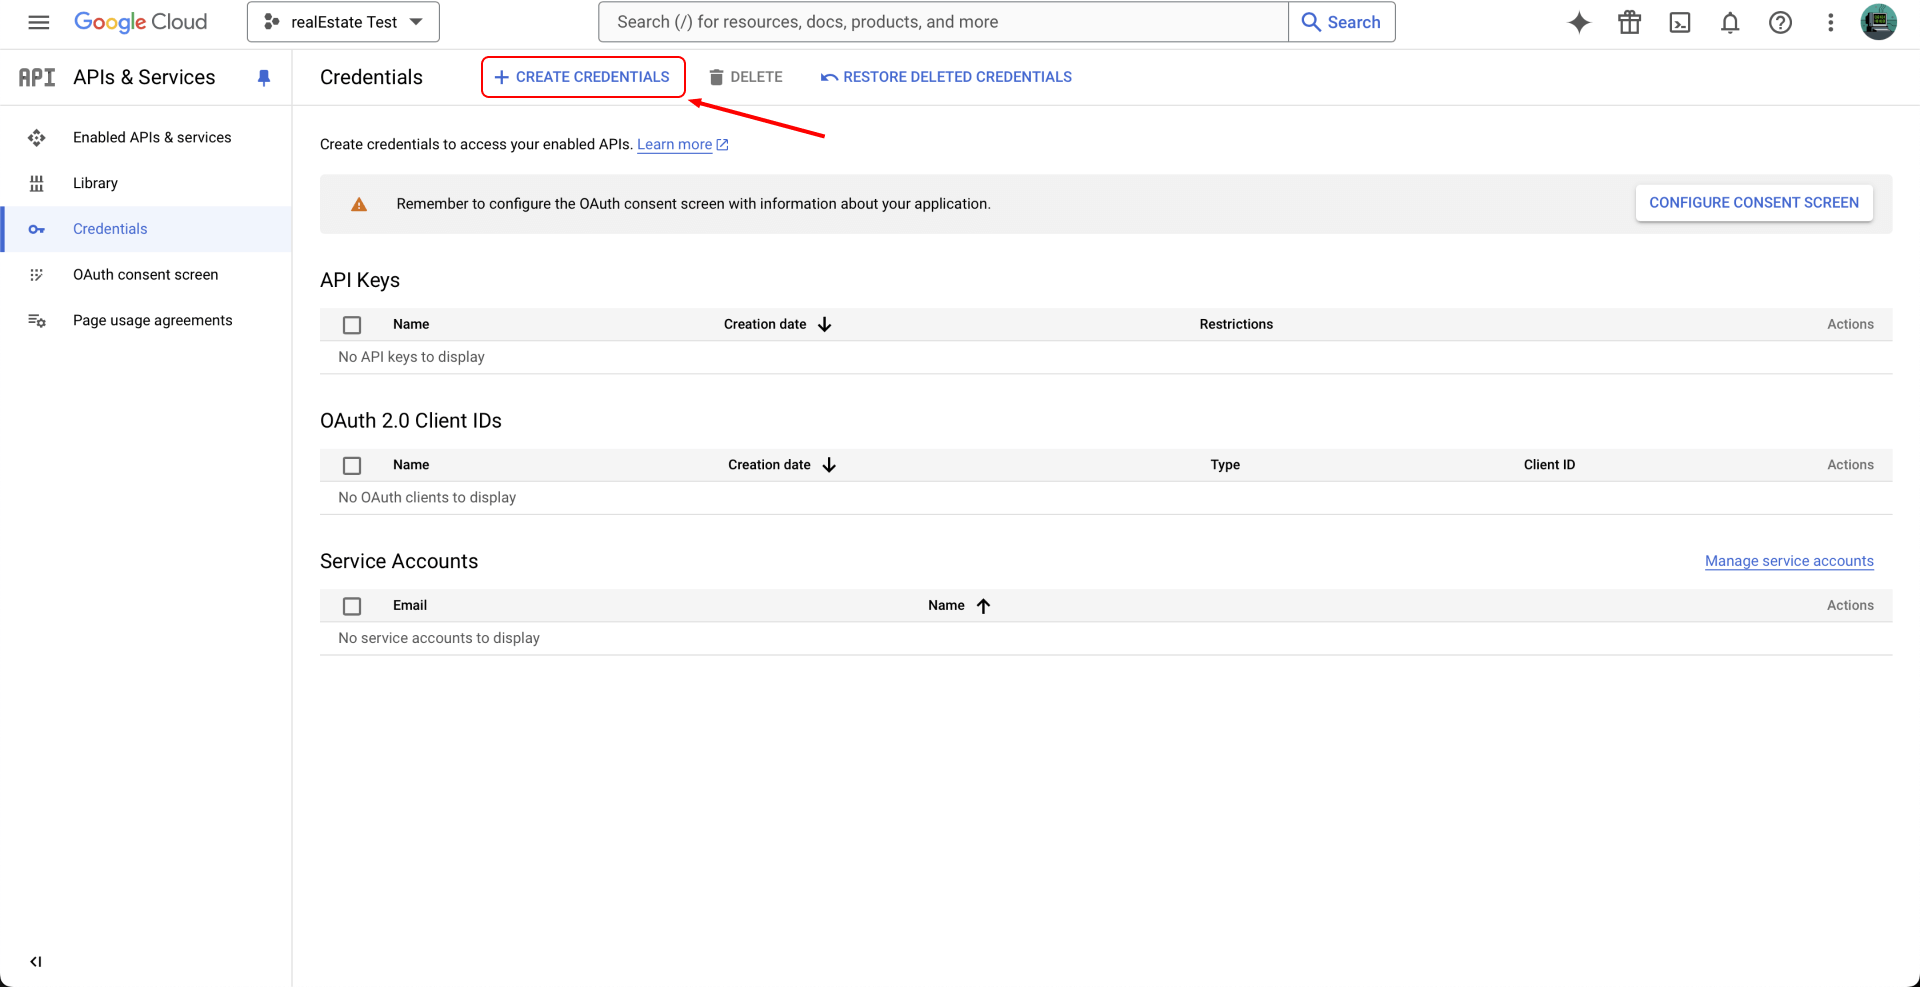
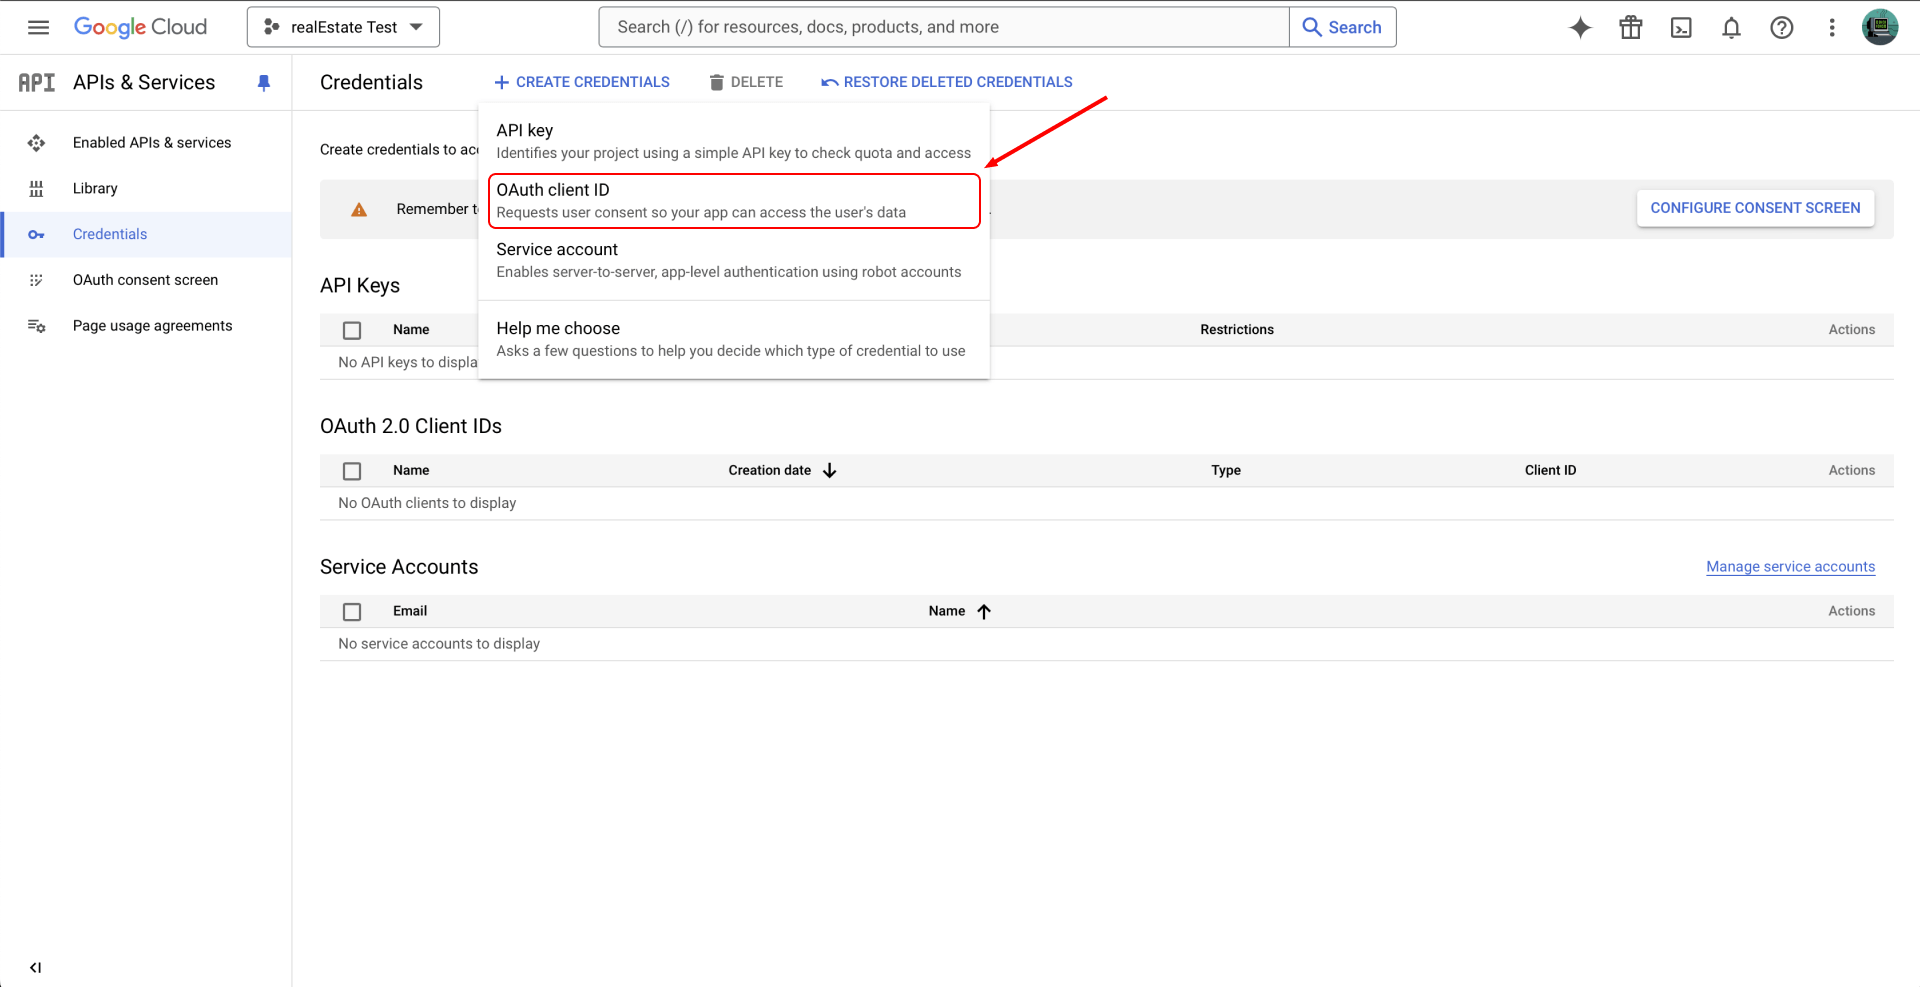
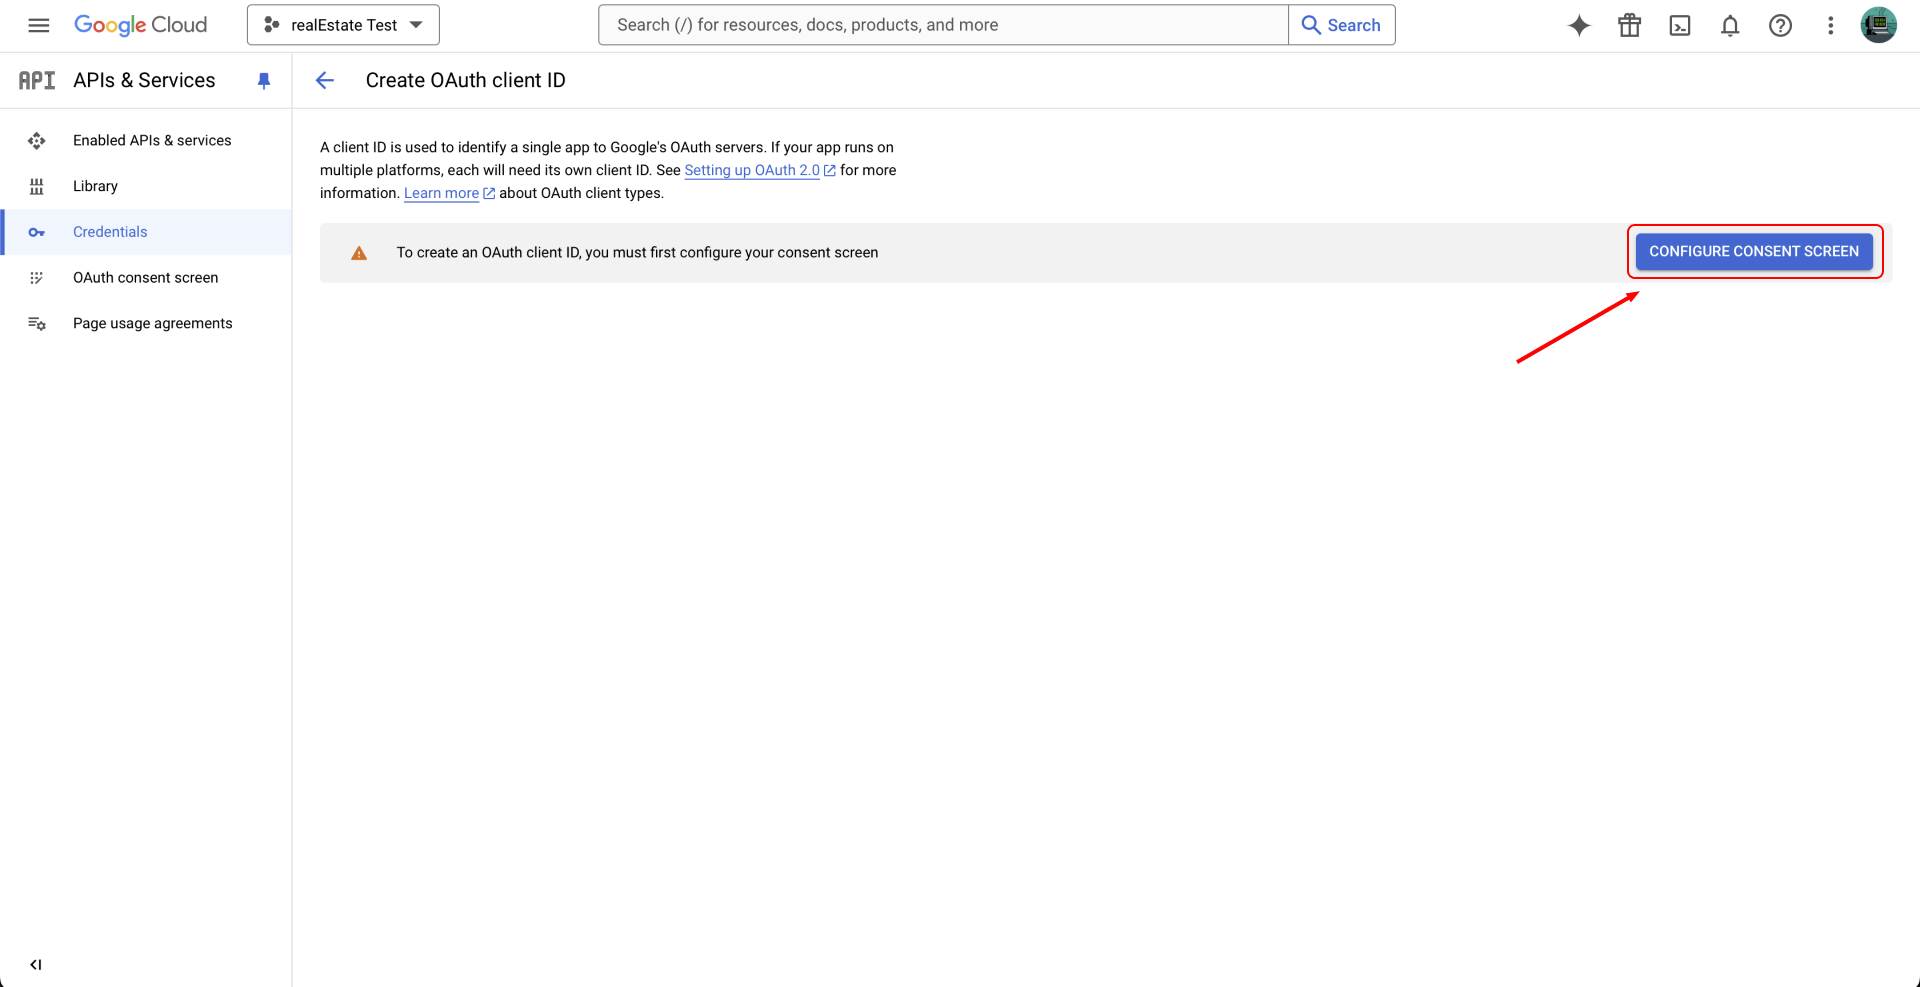
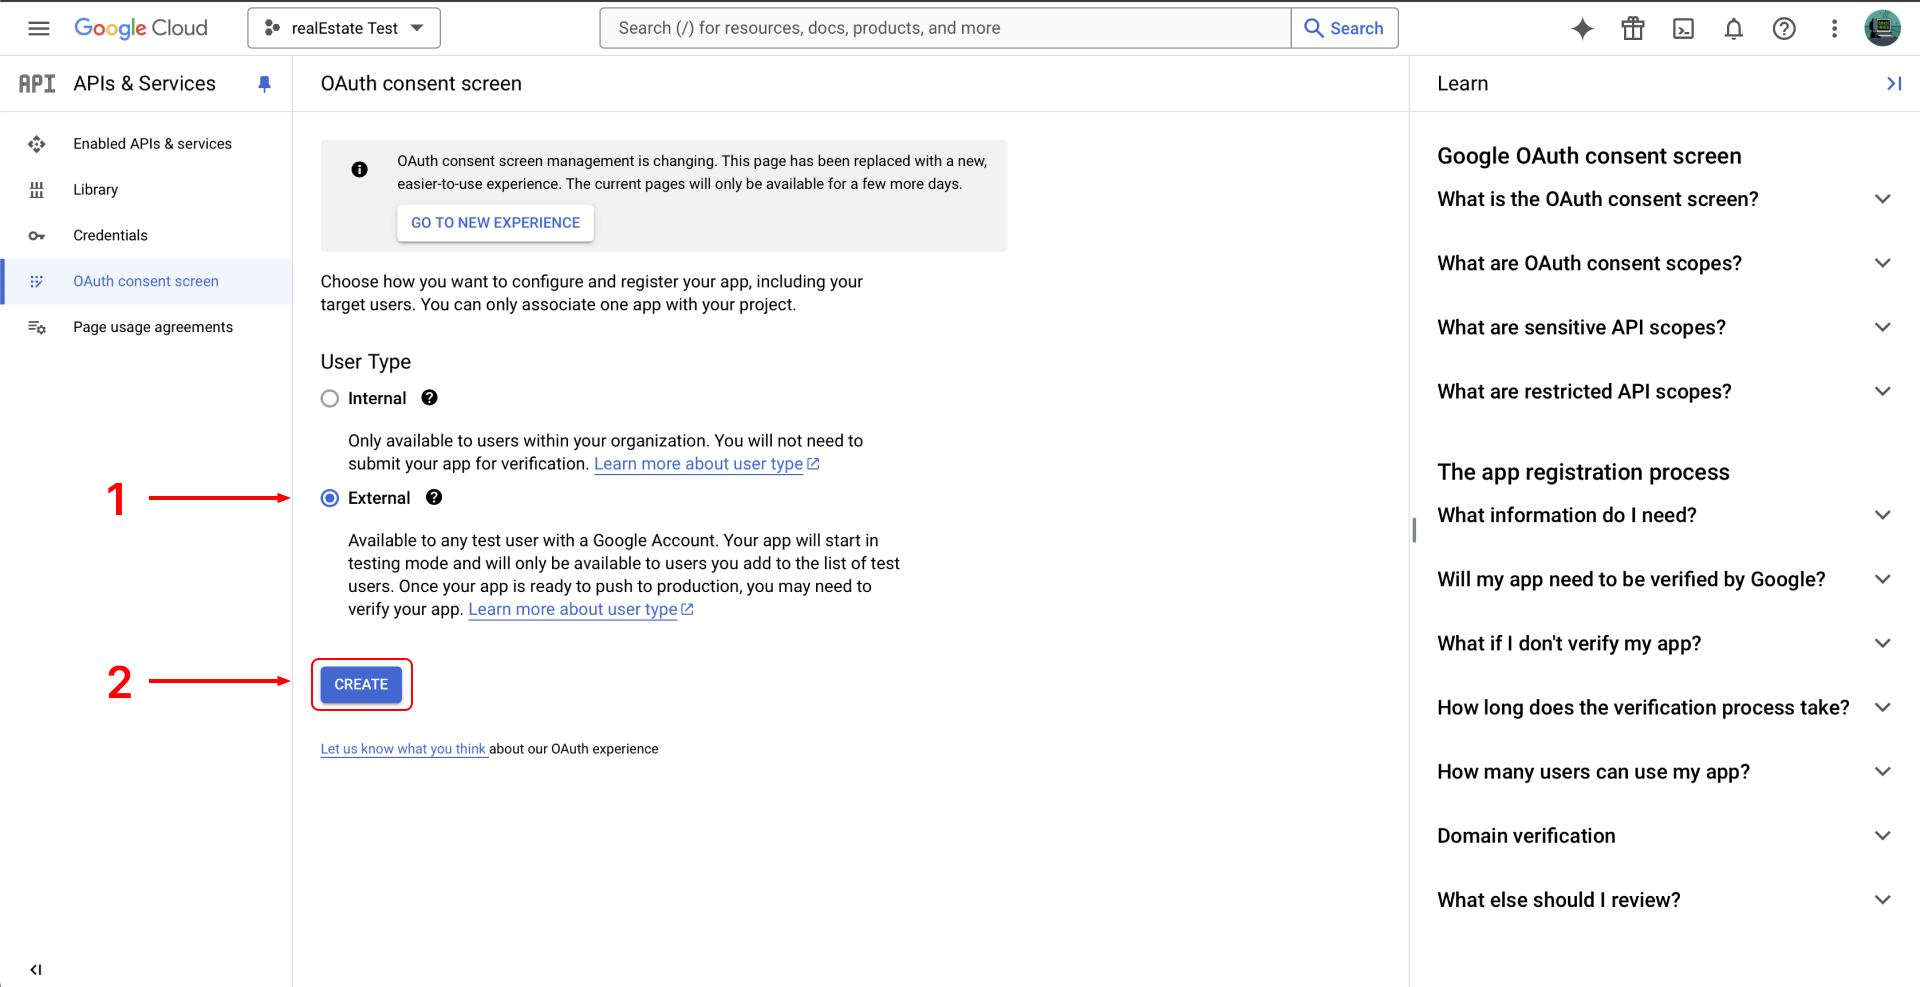
Required

Before getting started, ensure you have the following installed

  • Node.js (version 20.18.0 or higher)
  • npm (Node Package Manager)
    • npm comes pre-installed with Node.js. So you don't have to download it again.
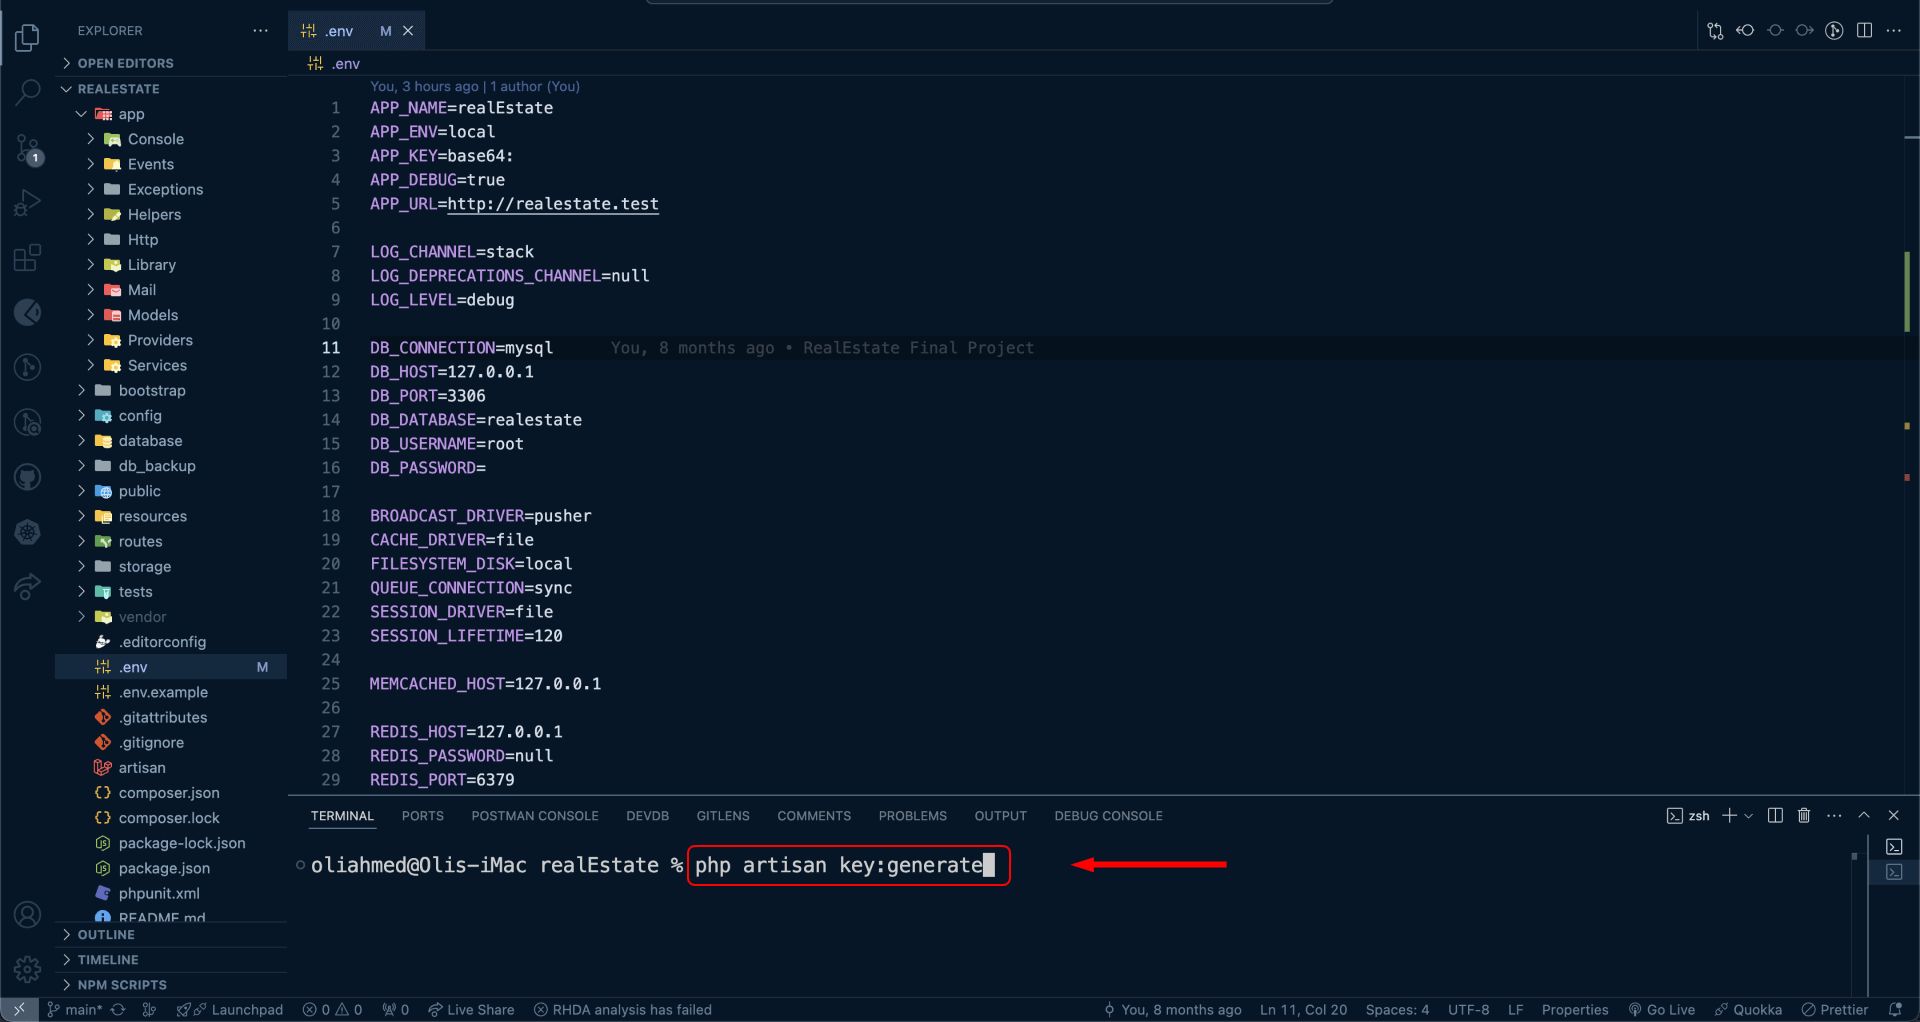
  • PHP (version 8.1 or greater)
    • Ensure that PHP 8.1 or later is installed. Download it from php.net
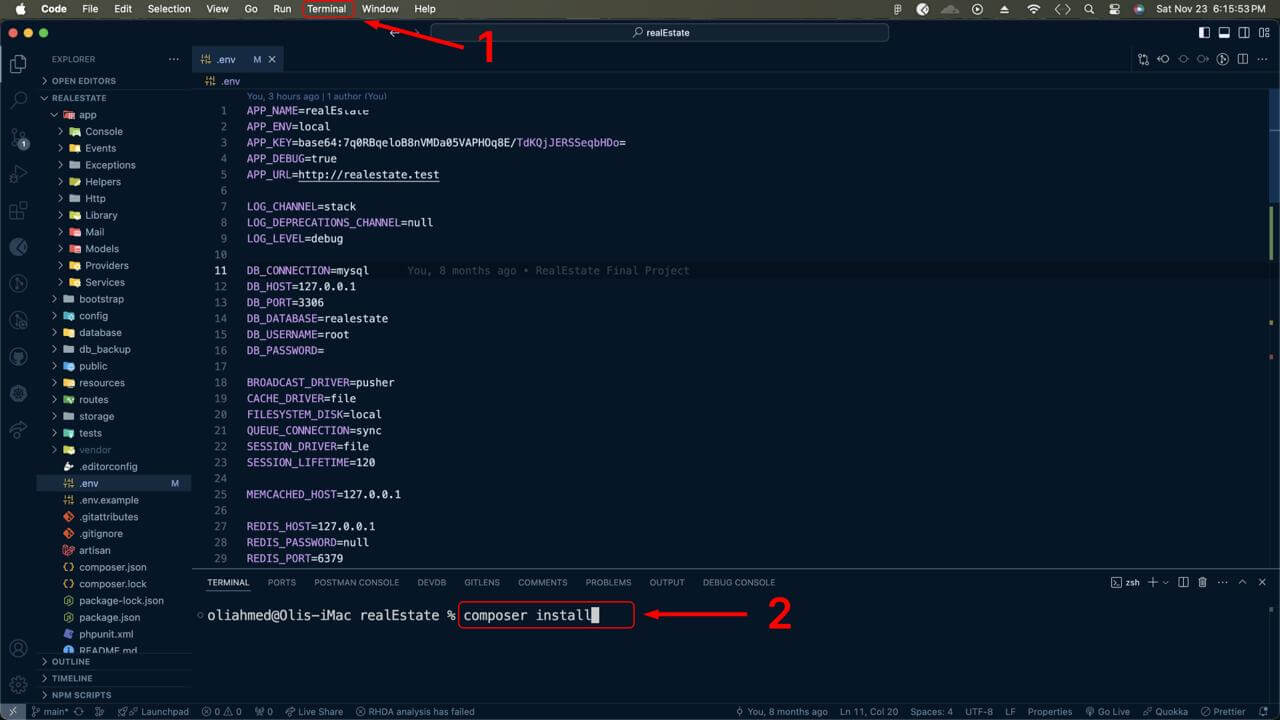
  • Composer
    • Composer is dependency manager for PHP. You'll use it to install Laravel and it's dependencies.
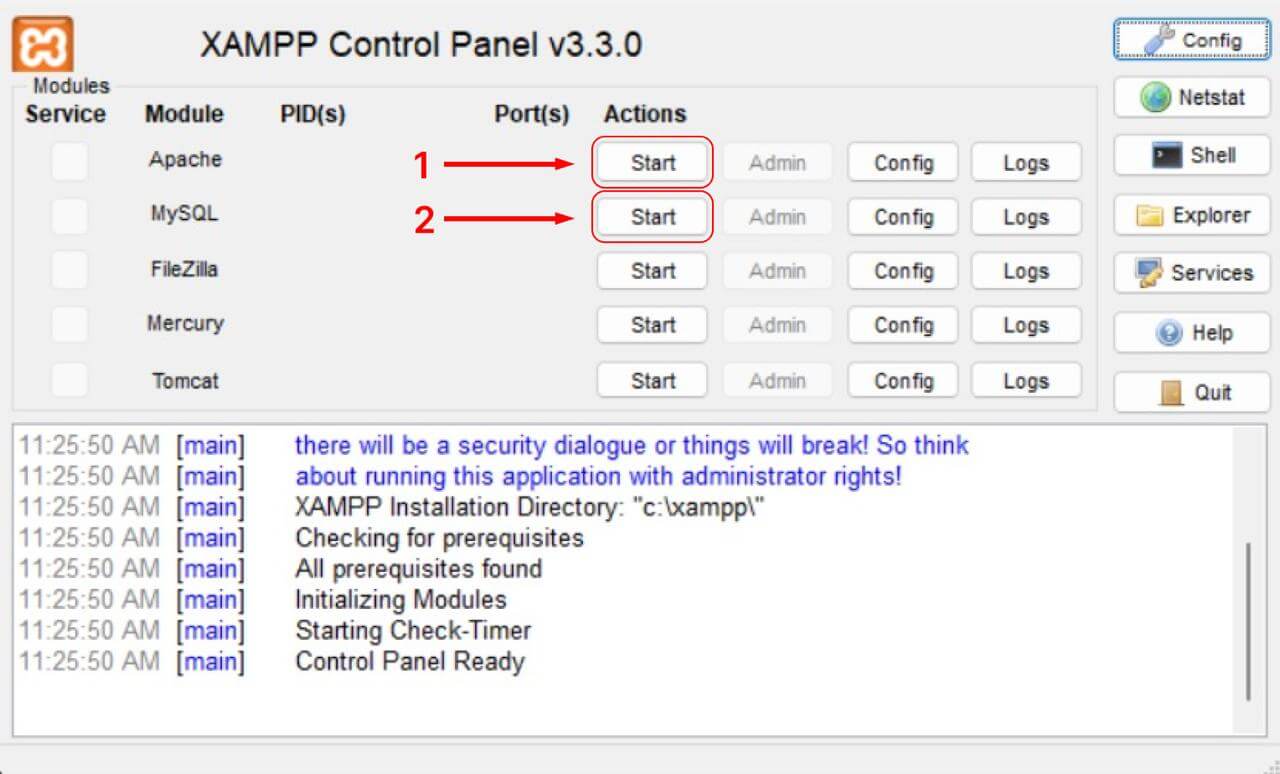
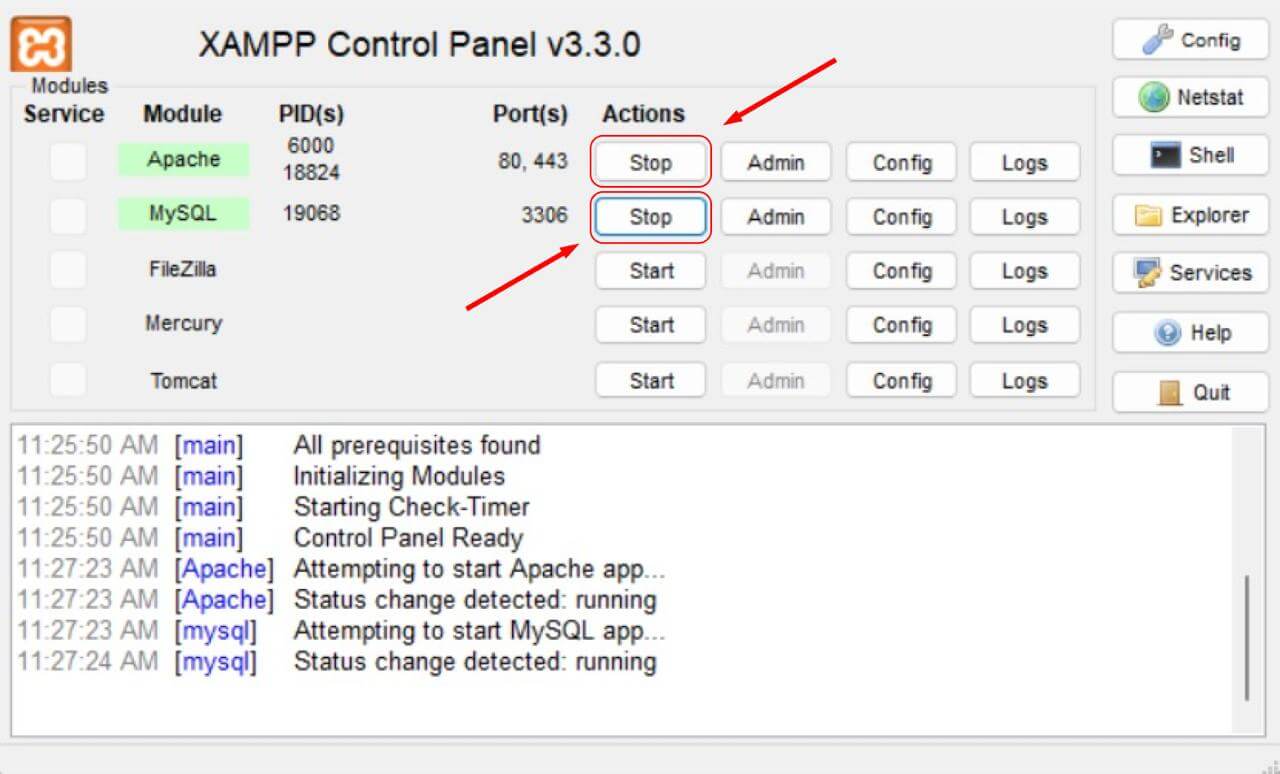
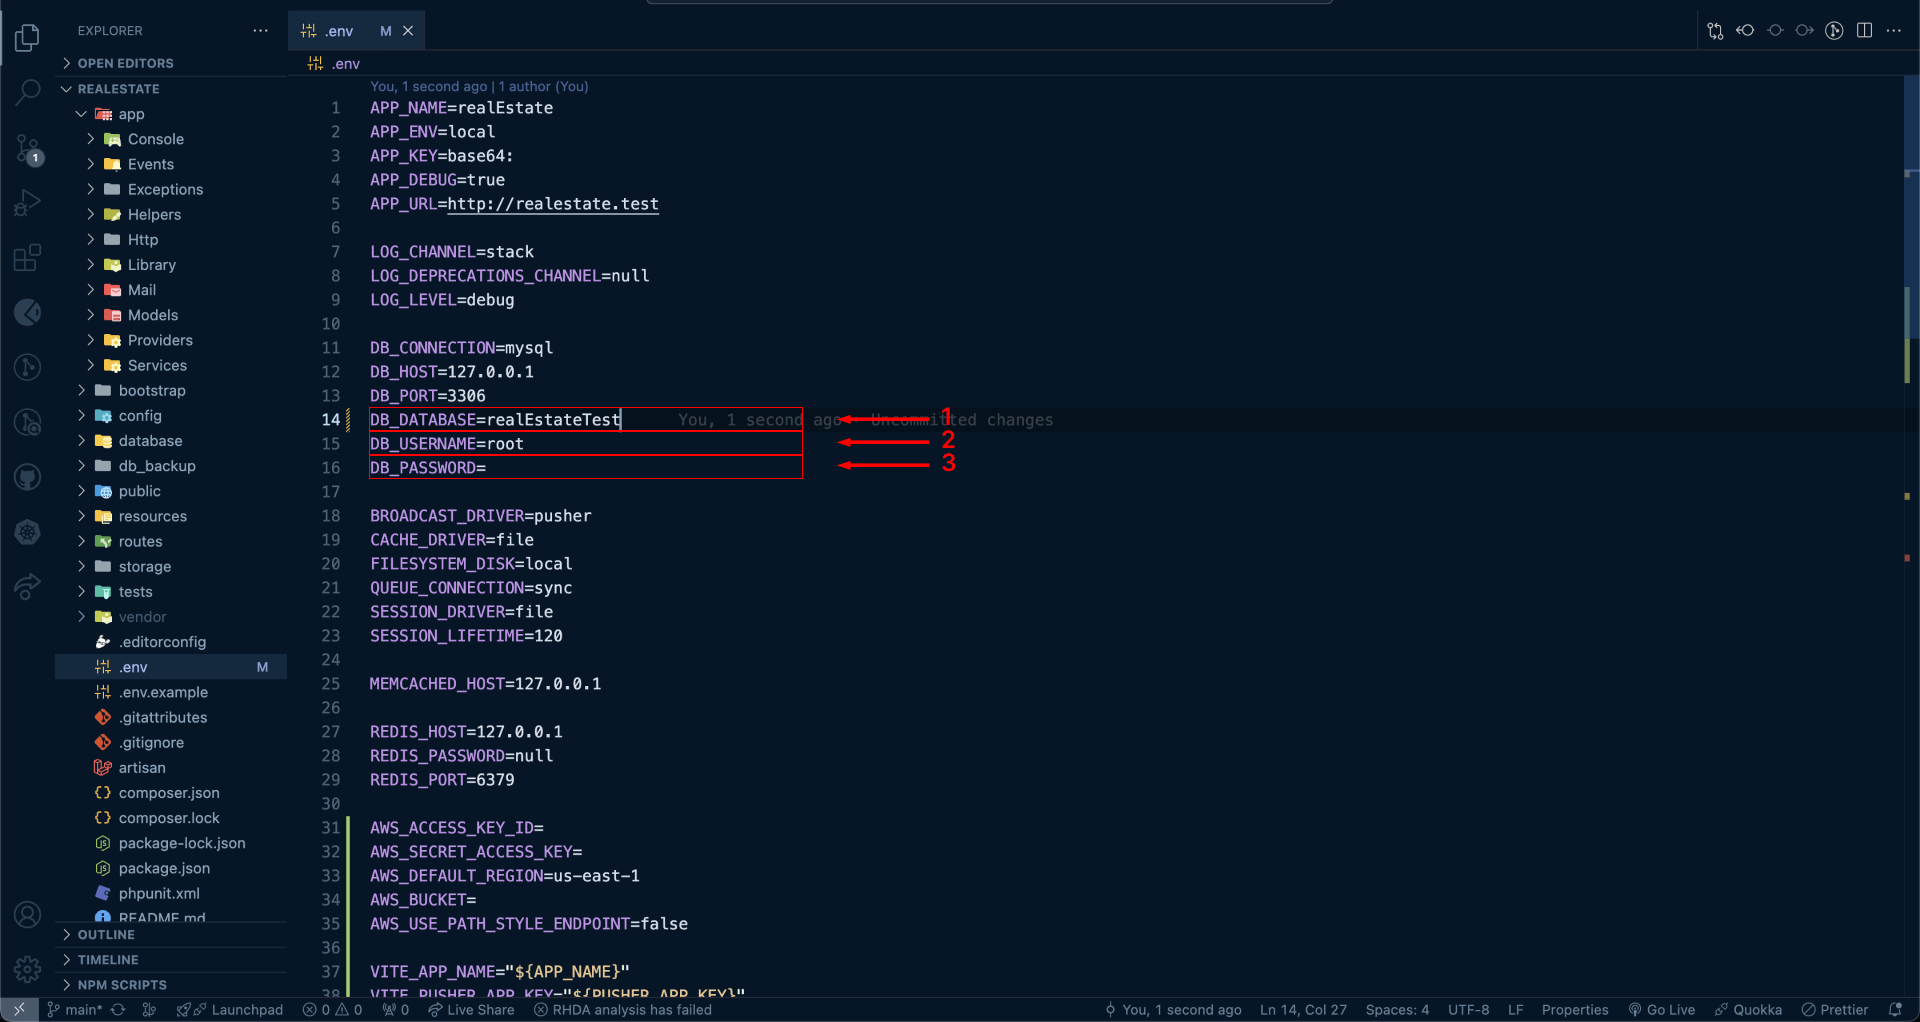
  • MySQL
    • Install MySQL on your local machine. Altervatively, you can use XAMMPP for local MySQL server setup.
  • VSCode or WebStorm
    • These are powerfull code editors that you can use to open and edit both the Laravel and Next.js projects.

Database & Backend

Run XAMMPP for MySQL and PHP by following the steps below:

  • Click on action button start to make it start.
  • Xamp has been started.

Database Setup

  • Go to localhost/phpmyadmin
  • Click on new to create new database.
  • Create a database in your mysql and put those info in next step.
  • Click import as shown in the picture to import a database (db_backup.sql) we have provided you.
  • After successfully import the provided database, it will look like these.
  • Open your backend project in either (VsCode/WebStorm). In the root directory, you'll find a .env file. Open the file and replace its contents with your specific environment variables, as shown in the image below.
  • Open the terminal and run the following command to install the necessary dependencies:
    composer install
  • After dependencies are installed, run the following command to generate the application key:
    php artisan key:generate
  • To start the Laravel development server, run: php artisan serve
  • Once the server is running, you should see the base API URL displayed in your terminal output.
  • Once the development server is running,
    • Base api url: http://127.0.0.1:8000/api is used for all your API interactions.
    • Image path url: http://127.0.0.1:8000/storage/ is used to access media files like images stored in the public directory.

Server Setup Guide

Follow The Instruction

  • To properly set up the server, follow the detailed guide step by step. Start the Setup

Admin Panel

Getting started

  • Open the project in VSCode. Then, open the terminal and run the following command to install dependencies:
    npm install
  • Create two files, .env.local and .env.production, in the root directory of your project. Add the following configuration to both files:
    • VITE_API_URL: http://127.0.0.1:8000/api — This is the base API URL we set up earlier from the backend.
    • VITE_IMG_URL: http://127.0.0.1:8000/storage/ — This is the image path URL for serving images.
  • To start the admin panel in development mode, run the following command in the terminal:
    npm run dev
  • To build the project for deployment, run the following command:
    npm run build
  • After a successful build, a dist folder will be generated in the project directory. This folder contains all the optimized assets and files needed for deployment.
  • You will need the contents of the dist folder later for deployment to your production environment.

Login to Admin Panel

  • Once the project is running, goto login page http://localhost:5173
  • Login using email and password.
    • Email: admin@gmail.com
    • Password: 12345678

Stripe Payment Gateway

  • Goto Stripe. Create a new account if not.
  • Once logged in, create a new project
  • Give a name, select a country of operation and create.
  • Copy the Publishable Key and Secret Key. You may need to click "Reveal Key" to see them.
  • In the admin panel, go to Payment > Payment Gateways and select Stripe as the payment method.
  • Paste the Publishable Key and Secret Key into the corresponding fields.
  • Save the configuration.

PayPal Payment Gateway

  • Log in to your PayPal Developer account.
  • Go to Dashboard > Apps & Credentials
  • Under REST Api apps, click Create App.
  • Name your app and click Create App
  • On the app details page, find your Client ID and Secret.
  • In the admin panel, go to Payment > Payment Gateways and select Paypal and enter your Client ID and Secret.
  • Save the changes.

Flutterwave Payment Gateway

  • Log in to your Flutterwave Dashboard.
  • Go to Settings > API Keys
  • Copy your Public key, Secret key and Encryption key.
  • In the admin panel, go to Payment > Payment Gateways and select Flutterwave and enter your Public key, Secret key and Encryption key.
  • Save the changes.

Razorpay Payment Gateway

  • Log in to your Razorpay Dashboard.
  • Go to Settings > API Keys
  • If no keys are generated, click Generate Key.
  • Copy the Key Id and Key Secret
  • In the admin panel, go to Payment > Payment Gateways and select Razorpay and enter your Key ID and key Secret.
  • Save the changes.

SSLCommerz Payment Gateway

  • Go to https://developer.sslcommerz.com/registration/
  • Create Sandbox Account by giving necessary information.
  • Once the sandbox account is created successfully, SSLCommerz will send an email to the registered email address. This email will contain your Store ID and Store Password, which are required for integrating SSLCommerz with your project.
  • In the admin panel, go to Payment > Payment Gateways and select SSLCommerz and enter your Store ID and Store Password.
  • Save the changes.

Mail Configuration SMTP

  • Go to Google Account Settings.
  • In the left sidebar, click on Security and enable 2-Step Verification under the "Signing in to Google" section.
  • After enabling 2-Step Verification, click on App Passwords.
  • Enter a name like "realEstate" and click Create.
  • Copy the 16-character App Password that Google generates for you. Keep it secure, as you’ll use it in your SMTP configuration.
  • In the admin panel, go to Configuration > Mail Configuration and enter the following SMTP configuration:
    • Mailer: smtp
    • Host: smtp.gmail.com
    • Port: 587 (for TLS)
    • Username: your Gmail address (e.g., yourname@gmail.com)
    • Password: 16-character App Password generated in previous step.
    • Encryption: TLS
    • Mail From Address: your Gamil address
    • Mail From Name: your site name.
  • Save the changes.

Pusher Configuration

  • Go to Pusher and sign up for a new account or log in if you already have one.
  • After logging in, click on Create App in the Pusher Dashboard.
  • Fill in the app details:
    • App Name: Enter a unique name for your app.
    • Cluster: Choose the region closest to your users.
    • Frontend: React
    • Backend: Laravel
  • After creating the app, go to the App Keys section to retrieve the following credentials:
    • App ID: Your unique App ID.
    • App Key: Your unique App Key.
    • App Secret: Your unique App Secret.
    • Cluster: The selected region for your app (e.g., `us2`, `eu`, etc.).
  • In the admin panel, go to Configuration > Pusher Configuration and enter the following
    • App ID: The App ID you copied from the Pusher Dashboard.
    • App Key: The App Key you copied from the Pusher Dashboard.
    • App Secret: The App Secret you copied from the Pusher Dashboard.
    • Host: api-ap2.pusher.com
    • Port: 443
    • Scheme: https
    • Cluster: The Cluster you selected when creating the app.
  • Save the changes.

Google Configuration

  • Go to Google Cloud Console and sign in with your Google account.
  • Create a new project by clicking on the Select a Project dropdown and choosing New Project. Enter the project name and organization details.
  • Once the project is created, select it from the dropdown.
  • In the left sidebar, go to APIs & Services > Credentials
  • Go to Credentials and click Create Credentials > OAuth Client ID.
  • Configure the OAuth consent screen by providing details such as App Name, Support Email, Logo, Privacy Policy URL, and Terms of Service URL.
  • After configuring the consent screen, choose Web application as the application type and add the appropriate Authorized JavaScript Origins and Authorized Redirect URIs (e.g., `https://www.myapp.com/oauth2callback`).
  • Click Create and copy the Client ID and Client Secret.
  • In the admin panel, go to Configuration > Google Configuration and Paste the Client ID and Client Secret and Redirect URL from Google Cloud Console into the respective fields.
  • Save the configuration.

Frontend (Next.js)

  • Open the project with VSCode. Then open terminal and Run
    npm install
  • Create two file (.env.local and .env.production) in the root directory of your project. And add the following items
    • NEXT_PUBLIC_API_URL=http://127.0.0.1:8000/api
    • SERVER_API_URL=http://127.0.0.1:8000/api
    • NEXT_PUBLIC_IMG_URL=http://127.0.0.1:8000/storage/
    • NEXT_PUBLIC_BASE_URL=https://yoursitedomain.com
  • Now you can run the frontend(Next.js) by npm run dev command in the terminal of VSCode
  • To build the project for deployment, run
    npm run build
  • Before building your Next.js project make sure your backend server is running.